Sunday, August 26, 2007

Black Gold

During my trip to Taiwan in April, I bought a mooncake presser from a bakery supplies shop there. I have seen similar plastic presser in Singapore however I was attracted to this particular one at it comes with interchangeable plates for different designs.

It was a breeze making these Chocolate Snowskins as I had only 'stamp' it out. I do not have to be very precise in measuring the weight of each dough covered lotus paste as the presser is able to accomodate as tall a mooncake as you want. Unlike the traditional moulds, each piece of cake has to be of the same weight. Too big and it will overfill the mould. Too small and you will have a very short mooncake. The best part of using this presser is that I did not have to make a ruckus with all the knocking and banging of the mould to dislodge the cakes.

Here are my Chocolate Snowskin Mooncakes, some dusted with edible gold luster dust.
Photo Sharing and Video Hosting at Photobucket

The presser with the interchangeable plates.
Photo Sharing and Video Hosting at Photobucket

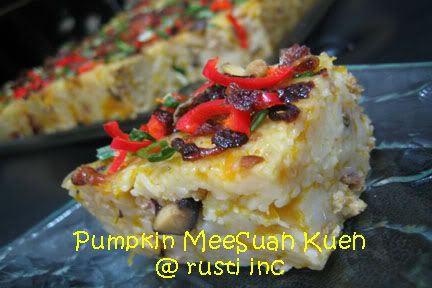
Steamed Pumpkin Mee Suah Kueh

This is for LingLing, who requested for the recipe

Photo Sharing and Video Hosting at Photobucket

STEAMED PUMPKIN MEE SUA KUEH
(Recipe adapted from Y3K Magazine)

Ingredients
240g mee suah
300g pumpkin flesh (shredded/grated)
4-5 Chinese mushrooms (soaked & sliced)
50g hae bee (soaked)
5 shallots – sliced
5 garlics – minced
120g minced pork or chicken
700ml water

Seasonings
1/2 tsp salt
1 tbsp sugar
1/2 tsp pepper
1 tbsp chicken granules
2 tsp light soya sauce

Garnish

1 red chilli, diced
1 stalk spring onions, diced

Method
1) Place mee sua in a sieve or colander, rinse with water, drain and keep aside.
2) Heat 3 tbsp oil in a wok and sauté shallots till golden brown. Reserve for garnishing.
3) Fry minced garlics, mushrooms, hae bee, minced meat and pumpkin shreds.
4) In another clean wok, add in some water to boil and blanch mee sua till water is absorbed. Add in the fried ingredients and seasonings. Stir well and adjust to taste.
5) Press mee sua firmly into a greased 9” tray and steam for 35 minutes
6) Garnish with red chilies, spring onions and fried shallots.

Note:
Although original recipe calls for 700ml water, I suggest you use 500ml boiled water first and then adjust accordingly to prevent mee sua from turning too soft and mushy.
I use Maicar brand of mee sua which is not salty and the strands are thicker. Each pack is about 280g (slightly more than the original recipe). I use the whole packet without changing the amount of water.

Sunday, August 19, 2007

Ensaymada

The other day, Elaine, my Filipino colleague brought back some Ensaymada from her hometown.

That was my first encounter with this cake-like bread. Actually, I am not sure if it is a cake or a bread. Anyway it was really delicious. It was covered entirely with grated cheese and it came in four flavors – original cheese, Ube (purple yam), Macopuno (young coconut) and Chocolate.

I googled for the recipe and found one which I tried today.

Mine turned out more like a very soft and fluffy bread and not dense like the one which Elaine brought back. It was nevertheless delicious with it’s rich butter taste and the generous shavings of cheddar cheese. I had made three flavours. Cheese, Angle Coconut Flakes and Chocolate.

The fillings were rolled inside the flattened dough and then coiled into a snail shape before baking. After that, they were slathered with softened butter, topped with cheese and good sprinkling of sugar.

If I had not been successful in creating anything close to an Ensaymada, I had definitely found myself a recipe for soft fluffy bread that is a keeper for sure.

Proofing the bread.
Photo Sharing and Video Hosting at Photobucket

Ensaymada ~ Plain Cheese, Chocolate, Angel Coconut
Photo Sharing and Video Hosting at Photobucket

Another shot of the bread.
Photo Sharing and Video Hosting at Photobucket

Inside, very soft and fluffy. This is plain, sans fillings sans topping.
Photo Sharing and Video Hosting at Photobucket

Sunday, August 12, 2007

Chocoholic Anonymous

I am almost dying of cold turkey from not making a cake or a muffin. I have not been baking for quite a few weeks now. So I took the opportunity last weekend to bake a blueberry chocolate cake for my niece's housewarming. As it looks too plain without any decorations, I decided to whip up a devillishly sinful bitter-chocolate garnache to top off the cake. A slice of this cake can send your heart racing as it is so..ooo rich in chocolate. I christened the cake Chocoholic Anonymous.

Photo Sharing and Video Hosting at Photobucket

Over the National Day holidays, I attempted doughnuts. I had great ambitions. My thoughts actually went wild with all sorts of toppings and fillings:- strawberry glaze, creamcheese filling, sour cream & onion, orange curd and almond-chocolate toppings. Alas, it was not meant to be. The dough was quite soft to handle and I lost patience as I could not get a nice doughnut shape. The frying part also put me on wits ends as it browned too fast even after I have lowered the flame.

In the end, I just made some odd looking shapes and tossed most of it in a simple cinnamon-sugar or have them chocolate-dipped with a sprinkling of almonds bits and angle coconut flakes. Oh yes, I made some cute little hundreds & thousands sprinkled hearts for the little girl next door. The doughtnuts tasted good but I guess I just lost patience in making them.

Photo Sharing and Video Hosting at Photobucket

With so much oil left in the fryer, dinner was Vegetarian Pork Cutlets. Boy these were good! You just sandwich two pieces of mock ham with cheese, batter them and coat them with breadcrumbs before frying. It was real good served with mayonnaise, cold tomatoes and lettuce.

Photo Sharing and Video Hosting at Photobucket

Friday, July 20, 2007

Here Comes the Bride (& Groom)

The last two weeks were a blur of activities at work and schoolfront. As the last time I attended lectures was 6 years ago, it was rather difficult to re-start my 'engine'. Mine! What a difference these 6-years made. I was struggling to stay alert during classes and was trying my best to 'save' the theories and concepts to the rundown CPU in my head! My notes taking skills had also deterioriated tremendously as before I could finished jotting down a point, I would have forgotten what the lecturer just said! Ah! That is but a sign of old age!

Anyway, as the course had just started, I could still squeeze in a little bit of time to do some baking. As promised to my niece Audrey a couple of months back, I made some 'Thank You' wedding cookies to be given to her guests at the solemisation of her marriage to Marvin at the Masonic Club today.

The sugar cookies were baked in a cascading size, tiered and decorated to look like minature tiered-wedding cakes. Individually packed, these were presented to her 50+ guests at the lunch reception after the couple's 'I Do'.
Photo Sharing and Video Hosting at Photobucket

Blushing Bride and Dashing Groom
Photo Sharing and Video Hosting at Photobucket

Isn't this bouquet of Purple Callas lovely? They are quite difficult to come by in Singapore and Audrey had these specially flown in from Holland.
Photo Sharing and Video Hosting at Photobucket

The Masonic Club is really a queer old place. Stepping inside the club, I feel as though I have been transported back to the Medieval times. I was half expecting a Knight to come charging through the heavy doors on a horse any moment. On every available inch of the wall, there were these framed up old pictures, maps and something-something(like Coat of Arms??) which gives the place a very cosy and antiquated atmosphere. In the member's area, there is even a soldier all garbed up in a very fine suit of armour!

Photo Sharing and Video Hosting at Photobucket

The Solemisation Ceremony was held in this lovely garden behind the Club
Photo Sharing and Video Hosting at Photobucket

~~~~~~~~~~~~~~~~~~~~~~~~~~~~~~~~
Earlier in the week, I managed to squeeze in a brownie order for a friend and a tirimisu for a colleague returning from the USA for a home visit.

I just had to call these Supernatural brownies as they are so devillishly chocolately, fudgy and well, supernatural. I had a chocolate high just looking the batter being poured into the baking tin.
Photo Sharing and Video Hosting at Photobucket
Packed
Photo Sharing and Video Hosting at Photobucket
And ready to go
Photo Sharing and Video Hosting at Photobucket

Oh no! Not another picture of a Tirimisu! This could well be the sixth or seventh Tirimisu in my blog!
Photo Sharing and Video Hosting at Photobucket

Sunday, June 24, 2007

Semi Retired from Blogging

Going forward, I guess I will have lesser time to bake and blog as I will be fully occupied with my studies for the next 18-months. Time will be tight as I will still be holding on to my fulltime job in an extremely fast-paced organization. I hope to be able to bake at least once every other week, more if time permits. Guess I will just go with the flow.

These are some of the stuff which I made the past week. I have been rather slack and was too lazy to take pictures of the Fruit Pastry and Morello Cherry Chocolate
Cupcakes which I made. Lazy me only managed to take photos of these which were made from whatever ingredients I could find in the kitchen.
Strawberry Yoghurt Cheesecake. This was made for my colleague's husband who is celebrating his birthday.
Photo Sharing and Video Hosting at Photobucket

Almond Biscotti.
Photo Sharing and Video Hosting at Photobucket

Panfried Glutinous Rice Packets.
Photo Sharing and Video Hosting at Photobucket

Sunday, June 17, 2007

Class of 77 Reunion

How time flies! In a wink of an eye, it has been 30 years since we graduated from Fairfield Methodist Girls School.

The Class of 77 Reunion tea party was mooted as a result of invitations to attend an Alumni Dinner in celebration of our school's 119 Founder's Day in August. As I know I will be busy during that period, I suggested for some of the girls to come over to my house for a gathering instead. It was quite tough rounding up the old girls as many of us have not been in contact since graduation. I must thanks Angeline (Yuet Yong) for making contact with some of the girls whom I have not met since 1977. We did managed to contact quite a number of them but due to work, prior personal commitments etc, some of them could not attend.

Anyway I am really happy for those who turned up. Thanks Angeline, Carolyne (Cheng Sim), Gina (Chay-Ling), Isabelle, Jenny (Wei Tin), Lay Khim, Linda (Lai Chan), Mary (Mui Eng)and Prudence (Mun Yee) for making the party a success. I truly enjoyed catching up with all you. It was really fun talking about the good ole days, the pranks and 'bullying' we did to each other and how some of us literally 'sucked the blood dry' of our Maths teacher Ms Lau.

Since we graduated, our school had gone through numerous changes. In 1983, the school was relocated to her present site in Dover Road from Neil Road, and in the same year, FMGS broke away from a 94-year tradition, it was the first Methodist School in Singapore to go co-educational.

We Fairsians are proud of our 119-year heritage and we are indeed grateful for the fantastic allround education we received from our teachers who are so dedicated in their profession.

And how could we forget the Fairfield School Song it has such meaningful lyrics and an upbeat tempo. Here is the final chorus: (Note: the original lyrics of the school song has been changed slightly in 1983 to reflect the co-ed status):

Here's to Fairfield, to Fairfield
To every student here
To every happy Fairsian
And to every teacher dear.
Oh! It's Fairfield, at Fairfield
Where all our hearts are light
Where love is in the sunshine
And all the world is bright.


Let's make time for a gathering again and the next time round, lets pray for more girls to join us in reminiscing the good old times.

Yearbook from our graduating year, ELDDS performance and class outng pictures.
Photo Sharing and Video Hosting at Photobucket
The centrepiece, Class of 77 Tirimisu Cake. This is our original FMGS school badge. It has since been changed to FMSS. The badge, school uniform and letters are made from a combination of sugarpaste and marshmallow fondant.
Photo Sharing and Video Hosting at Photobucket

Whipped up all these food myself. Hey, I was not a distinction Home Economics student for nothing you know! I have Ms Viswalingam to thank for this. Issuing her instructions in a military-style way, she taught us all we need to know about whisking, folding, creaming and baking. She was so strict with us that none of us dare as much as to whimper during her lessons. Those were the days when we had to manually beat in teaspoon full of eggs into our choux pastry till our palms developed blisters.
Class of 77 Tirimisu, Baileys Cheesecake, Strawberry Buttermilk Cake, Mango Mousse Cake, Fudgy Chocolate Blueberry Cake, Durian Swissrolls, Cupcakes with Creamcheese Frosting, Almond & Cranberry Chocolate Clusters, Chicken Curry, Fried Vermicelli & Chilled Cucumber Pork Rolls. The steamed Glutinous Rice is compliments of my mother-in-law.
Photo Sharing and Video Hosting at Photobucket
One for the album, group photos (yours truly in the brown top)
Photo Sharing and Video Hosting at Photobucket

Sunday, June 10, 2007

Happy Birthday Hubby

DH will turn 50 tomorrow. To celebrate the birthday of this 'half a century egg', I made him a Tirimisu Cake.

Happy Birthday Dar.

Nothing elaborate about the decorations. Just some simple flowers, butterflies and the number 50 in sugarpaste.
Photo Sharing and Video Hosting at Photobucket

Sunday, June 03, 2007

Crystal Tau Suan Cake

Photo Sharing and Video Hosting at Photobucket
A piping hot bowl of Tau Suan (mung bean) dessert with You Tiao (cruellers) on a rainy day warms the body.

But how about a slice of chilled Crystal Tau Suan Cake on a hot sunny day. The quivering jelly-like texture of this cake cools as it glides down your throat.

I had on Saturday, bought a slice of this Tau Suan Cake from a stall located at the Amoy Street hawker centre. Liking it so much, I had a go at it making a tray for myself today. I adapted a waterchestnut cake recipe and used cooked mung beans to replace the chopped waterchestnuts. Although the piece which I bought did not have you tiao (cruellers) in it, I decided to add some myself. With the addition of cruellers, the cake tasted so much more like a bowl of Tau Suan.

CRYSTAL TAU SUAN CAKE
Ingredients
100g mung beans, soaked for 1/2 an hour and steamed till cooked
½ piece crueller, cut into small pieces.
120g waterchestnut flour
1 tbsp tapioca starch
1 cup water
200g sugar
2 blades pandan leaves
2-3/4 cups water

Method:
1) Mix the waterchestnut flour, tapioca starch with the 1 cup of water. Strain to remove all lumps.
2) Boil the 2-3/4 cups water, pandan leaves and sugar till the sugar is dissolved and the syrup is fragrant.
3) Measure out 2-1/2 cups of the syrup or make up with more water till you have 2-1/2 cups.
4) Add the steamed beans to the syrup, stir in the water chestnut starch.
5) Boil over small flame and stir non stop till mixture is translucent making sure the mixture does not get burnt.
6) Switch off the flame and stir in the crullers bits.
7) Pour into a greased 7” square tin and steam for 20 minutes.
8) Cool thoroughly before cutting with a lightly greased knife.
9) Chill in an airtight box to prevent the cakes from drying out.

Photo Sharing and Video Hosting at Photobucket

Saturday, June 02, 2007

Chee Cheong Fun - Recipe

Photo Sharing and Video Hosting at Photobucket
This is for Anonymous who requested for the recipe:

(Recipe reproduced with the kind permission of CWL in the USA):
CHEE CHEONG FUN
Ingredients:
150g Rice Flour
1-1/2 Tbsp Wheat starch flour (Tang Mien)
2 Tbsp Cornflour
1 Tbsp Oil
2 cups Water
1/2 tsp Salt

Method:
1. Sift dry ingredients together.
2. Slowly add the water, mixing as you add. Strain to remove lumps.
3. Lastly add the oil and salt and mix thoroughly. Set batter aside for at least an hour.
4. Prepare your steamer and place an oiled stainless steel plate inside.
5. When water is boiling, ladle and spread batter onto the plate. Steam for about 4-5 mins.
6. Roll it tightly. Place rice rolls on a plate and brush with a little oil. Continue with the rest of the batter.

Sweet Sauce (Thim Jeong):

1/2 cup water
7 Tbsp Hoisin sauce
3 Tbsp soya sauce
3 Teaspoon black soya sauce

Mix all ingredients together and cook over medium flame until slightly thick.

Garnishings:
Toasted sesame seeds.

Thursday, May 31, 2007

Chocolate Bread

Photo Sharing and Video Hosting at Photobucket

The name Chocolate Bread is a misnomer as this is really a very rich chocolate pound cake. It is probably called a bread as it resembles a dark rye bread.
Photo Sharing and Video Hosting at Photobucket
The bittersweet coming from the Dutch processed cocoa powder and a good brushing of Kahlua syrup makes this pound cake so deliciously aromatic. (Recipe taken from The Cake Bible by Rose Levy Berandaum)

CHOCOLATE BREAD
Ingredients:
23g Dutch processed cocoa powder
44g boiling water
6g vanilla
150g eggs (without shell)
125g cake flour
175g sugar
3.7g baking powder
1/4 tsp salt
184g unsalted butter (room temperature)

Method:
1) Mix cocoa powder with the boiling water till smooth.
2) Let mixture cool and stir in the eggs and vanilla.
3) Sift cake flour, baking powder and salt together. Add the sugar to the dry ingredients and stir well to distribute the sugar.
4) Put the flour into a medium sized mixing bowl, add half the cocoa mixture and the butter. Mix well with the paddle attachment for 1 minute and scrap down the sides.
5) Gradually add in the balance chocolate mixture in two batches, beating well after each addition.
6) Pour mixture into a greased and floured loaf pan (8" x 4") and bake at 175degF for 50 to 60 minutes or till a wooden skewer inserted in the center comes out clean.
(cover loosely with a buttered foil after 25 minutes to prevent overbrowning.
7) Cool in the pan for 10 minutes before turning out to cool further.

Kahlua Syrup (Optional - for brushing to add extra moistness)
Boil 1/4 cup water with 2 tbsp sugar till rolling boil. Cool and add 1-2 tbsp Kahlua
Brush onto the top of the cake (still in the pan) immediately on removal from the oven. After 10 minutes, turn out the cake and brush the sides with more syrup and leave to cool

Sunday, May 27, 2007

In Memory of Mum

Photo Sharing and Video Hosting at Photobucket
Here is the Zebra sandal atop a Shoebox Cake which I made for my mum's death anniversary yesterday. The shoebox was a Red Velvet Cake sandwiched with a Peanut Butter buttercream and covered in Marshmallow Fondant. The Shoe and barcode are made out of gumpaste. The shoe is branded Lilly after mum's name.

I had intially intended to make a pink sandal with a bow that was dusted with pearl luster dust.
Photo Sharing and Video Hosting at Photobucket
Alas, the shoe collapsed and I had to redo everything from scratch. It was a good learning experience though because for the pink shoe, I did not make a very good template to dry the sole. The sole was rolled too thin and I had only used a cardboard folded into shape to support it while it was drying. So the gradient was too sharp and it looked weird. I also removed the cardboard circle supporting the toe cap too early which resulted in it collapsing.

For the Zebra shoe, I had cut a block of styroform into a drying platform for the sole.
Photo Sharing and Video Hosting at Photobucket
The sole was rolled thicker and marked with stitching marks. Straps were attached and supported with crunched cling wrap to hold it's shape while drying.
Photo Sharing and Video Hosting at Photobucket
The Zebra shoe atop the Shoebox.
Photo Sharing and Video Hosting at Photobucket
Close-up of the front.
Photo Sharing and Video Hosting at Photobucket
The front of the shoebox with it's barcode.
Photo Sharing and Video Hosting at Photobucket

The insides of the Shoebox, Red Velvet Cake with a Peanut Butter buttercream.
Photo Sharing and Video Hosting at Photobucket