Sunday, June 28, 2009

Berry Nice Strawberry Bars

I have so far only tasted Lemon Bars which I loved for its citrusy flavor. So when I came across a recipe for Strawberry Bars I told myself that I have to try it out for myself.
Fruits,Strawberry,Berries
If you can imagine eating a buttery shortbread that is spread with strawberry jam then you are almost there. The Strawberry Bar is one notch better as the 'jam' part is part custardy and sticky at same time. Lemon juice and zest gave it the tangy kick while the distinctive strawberry makes this a 'berry nice' bars.

Cookies,fruits

Friday, June 26, 2009

My Beef Stew

This was last Sunday's lunch which I only found time to post now. I did not follow any recipe but made a shopping list of the ingredients I think I need. I ended up with 2 trays of beef chuck tender, 2 bags of carrots, 1 bag each of large onions and potatoes, 1 bottle of Virginia Dare Cooking Sherry, 2 boxes of chicken stock, a 3-pouch pack of Masterfood Bouquet Garni. On an impulse I added two cans of stewed whole tomatoes into the trolley. Not wanting to have any vegetables leftover from cooking, I proceeded to use up everything in sight. So in a way, I created my own recipe as follows:
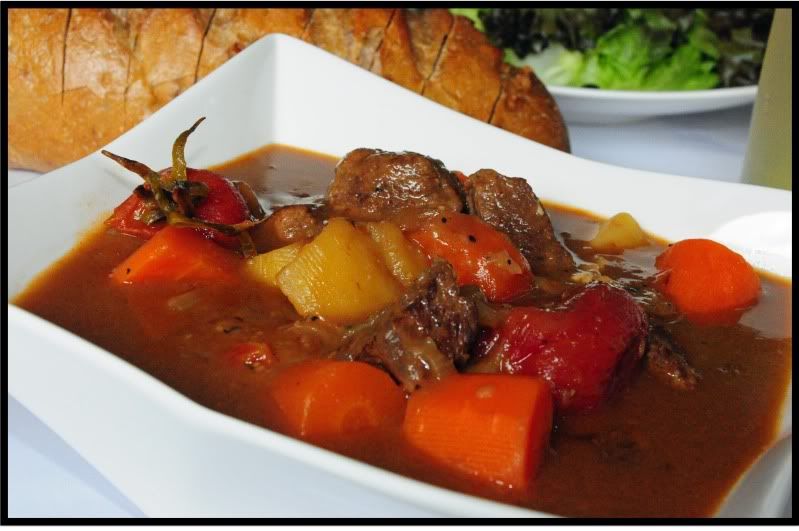
beef stew
My Beef Stew
Ingredients:
1.7kg beef chuck tender, diced into cubes
500gm large onions, chopped
1kg carrots, diced in big chunks
1kg potatoes, quartered
12 garlics, smash and remove skin
375ml cooking sherry
2 litres chicken (or beef) stock
2 x 411g canned stewed whole tomatoes (I added the juice from only one can of tomatoes)
2 tbsp maple syrup (also added on an impulse to balance the sourness of the tomatoes)
2 pouches bouquet garni
4 tsp black pepper
4 tsp worchestire sauce
Flour for dusting
Olive Oil

Method:
1) Dust the beef in flour and brown in batches in some olive oil. Set aside.
2) In a deep pot, sweat the large onions in some olive oil. Add garlic and continue sauteing until the onions is almost caramelised.
3) Add the browned beef, black pepper and worchestire sauce and stir for a while. Add in the cooking sherry. Let it simmer for a while to evaporate the alcohol.
4) Add the bouquet garni, carrots and 1 litre of chicken stock. Bring to the boil and then lower heat. Simmer for about 45 minutes stirring occasionally.
5) Add the potatoes and the balance 1 litre of stock and continue cooking till beef is tender.
6) Adjust seasoning. (At this point, I added the maple syrup!).
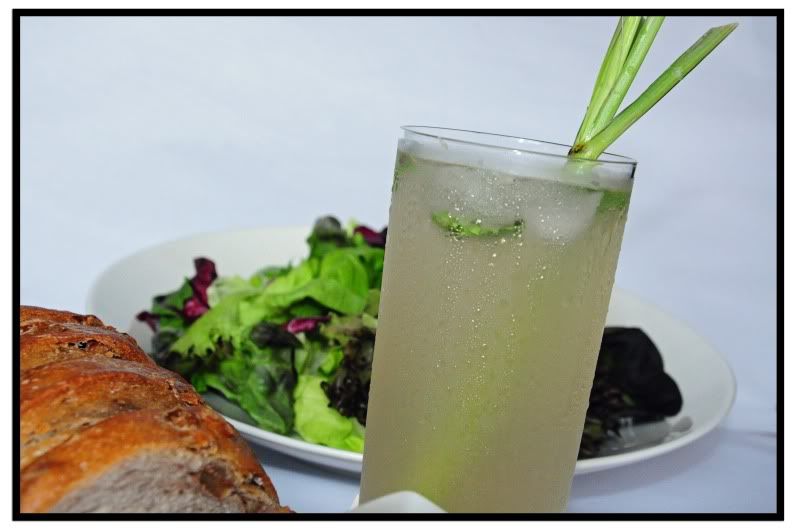
7) Serve hot with a crusty bread and a green salad.

Washed down with a glass of refreshing Mint Lemongrass Lemonade Chiller
beverages,drinks.
Note:
1) You may wish to thicken the stew if you find it too watery. I made a roux by melting approximately 100gm of butter in a small saucepan over low fire. Add 1 heap tablespoon of flour and fry till the flour turns slighty brown. At this point remove the saucepan from the flame and pour in a 1/2 cup of water and stir till smooth. Bring saucepan back to the flame and stir till thick and shiny. Temper the roux with some gravy from the stew before adding it to the stew to thicken it.
2) I did not add any salt to the stew as the chicken stock is already salty as is the bottle of cooking sherry from Virginia Dare.

Cupcakes for my Daughter

Today is the last day of work for my daughter at a designer furniture company. She has worked there for slightly over a year and she decided it is time to make move to a position that has more relevancy to her Mass Communications Degree.

These cupcakes are for her to bring to the office as a farewell treat for her colleagues.

Vanilla Cupcakes using a recipe from the Magnolia Bakery and with a Creamcheese Frosting that I put together with some icing sugar, butter and vanilla extract.
cakes; Cupcakes; Cream Cheese
Saying Ciao
cakes; Cupcakes; Cream Cheese

Tuesday, June 23, 2009

Apricot Cheesecake Ripple

I bought a tray of lovely luscious golden apricots from the supermarket last night and made these yummy Apricot Cheesecake Ripple which was adapted from a recipe originally using plums.
The cake has a very nice caramel flavor coming from the dark muscovado sugar and a slight salty flavor from the creamcheese ripple. Once baked, the apricots were bursting with juice, was cottony soft and it felt like with each bite, tangy apricot conserve oozing into your mouth.
It would be a good idea after filling the tray to drop the tray a couple of times onto your table top to remove any trapped air bubbles. I did not do that as you can see from the picture below – two big holes in the cake.
Cakes,Fruits
Apricot Cheesecake Ripple
Ingredients:
250g cream cheese, softened at room temperature
1 tsp vanilla extract
3-3/4 tbsp sugar
5 eggs
220g butter, softened at room temperature
220g dark Muscovado sugar
250g plain flour
1-1/4 tsp baking powder
400g fresh Apricots, halved, stoned and diced
Method:
1) Preheat oven to 175 degree C.
2) Grease and line a 20x30cm lamington tray making sure the paper is extended about 5cm above the tray on all sides (this is to add removal of the cake after baking).
3) Cream the cheese, sugar, vanilla extract and 1-1/2 eggs together till smooth and free from lumps.
4) In another bowl, cream the butter and Muscovado sugar till creamy. Add the balance 3-1/2 eggs and continue creaming till light and fluffy.
5) Beat in the sifted flour and baking powder for approximately 2 minutes till well combined.
6) Spread half of the flour mixture onto the tray, dot with half the cream cheese mixture and scatter with half of the apricots.
7) Repeat with the balance flour mixture, cream cheese and top with the balance apricots.
8) Bake for 30-35 minutes in the centre of the oven till just firm to the touch. The cream cheese ripple will firm up further when cool, so do not overbake.

Monday, June 15, 2009

7-Up Bundt Cake

My brother bought this Kitchen Aid bundt pan for me quite a while back and, like the few other baking pans which he bought back from the US, they have yet to be used.

So yesterday, I googled for a Bundt recipe and I came across this 7-Up Bundt Cake which sounded very interesting and pardon the pun, refreshing too. All the reviews for this cake were good except some said it was sweet.
Photobucket
I made some adjustments to the sugar and also used a combination of plain flour and cake flour for this recipe. I also added lemon zest and some lemon juice abeit insufficient, to perk up the lemon-lime flavor of the 7-Up.

Even though the pan is non-stick, I gave it a good coat of baker's grease as I want to be sure the cake can be removed without any problem. Sticking is an inherent problem with Bundt cake pans due to the intricate designs.
Cakes
The cake was very soft and with tender crumbs. However, despite reducing the sugar, it still tasted sweet to me. The taste of 7-Up is not very apparent in the baked cake although you can still taste it faintly.
Photobucket
I will bake this cake again some other time however the sugar must be reduced further and more lemon juice added.

I am glad I did not make the icing sugar glace to drizzle over the cake otherwise the cake would taste even sweeter. I cannot however, resist the temptation of sifting a wee bit of snow sugar over the cake though.

7-UP BUNDT CAKE
(13 cup capacity bundt pan)

Ingredients:
425g butter
690g sugar
6-1/4 eggs
350g plain flour
120g cake flour
1 tsp baking powder
2 tsp lemon essence (or 1 tsp each of lemon and vanilla essence)
225ml 7-up
Juice from 1/2 a lemon
Zest from 1 lemon

Method:
1) Preheat oven to 165 degree C.
2) Grease Bundt pan very well making sure all the nooks and crannies are greased.
3) Cream butter and sugar till light and fluffy.
4) Add eggs, one at a time beating well after each addition.
5) Add the 7-Up to the lemon juice to make up 225ml, then add in the essence and zest.
6) Fold in the sifted flour alternating with the 7-Up to the creamed mixture.
7) Spoon mixture into the prepared pan and bake for 60-75 minutes.
8) Skewer test near the centre of the cake. Cake is ready when no crumbs stick to the skewer.

Baker's Grease:
Mix equare ratio of shortening, flour and vegetable oil into a smooth paste. Use this to grease the Bundt pan. Balance grease can be stored in an airtight container for future use.

Saturday, June 13, 2009

Milk Squares

This is one of those recipes which I copied a long time ago and in my 'to-do list'. Finally had the chance to make it last night.

Photobucket
This bread is kneaded and allowed to proof in the fridge overnight. I made the dough close to midnight yesterday and stayed up till around 2.30am for the 1st proofing while I finish up some office work. This morning, after returning the dough to room temperature, it was then shaped and cut into squares and given a final proofing before baking.

The first tray was spoilt because the oven temperature and timing indicated in the recipe was faulty. It stated to bake for 20 minutes at 230 degree C. Looking at the 4cm x 4.7cm cubes of bread, I decided to bake it at half the time. However even before the 10 minutes was up, all the milk square were baked to a burn. As I do not have the source for this recipe, I am unable to ascertain from the orginal blog if it was my mistake to copy the wrong baking temperature or if it was a genuine mistake of the original writer and if she has had the chance to update this error on her blog. Anyway, I lowered the temperature to 180 degree C and baked the second tray for 8 minutes and they turned out perfect.

The bread is soft, fluffy and mildy sweet. Just remember that the dough has eggs, milk powder and condensed milk in it. So please put it in the fridge for the overnight proofing. With our (Singapore) kind of hot weather, the rich dough can turn bad easily.
Bread
MILK SQUARES
Ingredients:
210gm bread flour
90g plain flour
3g baking powder
9g instant yeast
27g fine sugar
3g salt
75g condensed milk
9g milk powder
Half a beaten egg (approx 30g)
111g water
21g softened butter

Method:
1) Mix beaten egg, water and condensed milk together
2) Combine all dry ingredients together in a mixing bowl, add the liquid and knead for 9 minutes.
3) Add butter and continue kneading for a further 12 minutes or until not sticky.
4) Form into a ball. cover and let it proof for 1-2 hours or until double in size.
5) Knock out the air and shape into a ball. Place in an airtight container and leave in the fridge overnight.
6) Next morning, put the dough on a table, cover lightly with plastic wrap and let it return to room temperature (approx 30 - 40 minutes).
7) Knead lightly and shape/roll into a rectangle shape measuring 14cm x 28cm.
8) Cut into squares measuring 4cm x 4.7cm.
9) Place on a greased or parchment lined tray and proof for 20 minutes or till double in size.
10) Bake at 180 degree C for between 7 to 10 minutes till light brown.

Wednesday, June 03, 2009

Longans Muffins

A couple of weeks back, Dolly, my friend from Taiwan was in town on business. She brought me a box of lovely muffins and muah chee from Gui Yuan Cake(www.guiyuancake.com.tw). They are well known for their Dried Longan Muffins and have won several awards for them too. The shop takes its name after the dried longan which is called Gui Yuan in Chinese. Dolly mentioned that the Taiwanese believe that eating these muffins, especially during the colder months, has a warming effect on the body.

The muffins are choked with hydrated dried longans and chopped walnuts. The dark brown cake has a rich molass flavor and is moist though dense. Biting into one actually reminded me of eating a very fragrant Huat Kueh.

I did some googling and found a few recipes for this muffin and finally settled for one which I felt was a good representation of the ingredients and method I imagine.

Although the original recipe uses cake flour, I replaced that with top flour as I felt it would yield an even more superior product.
Photobucket
Come on, give this recipe a try and you will be enchanted by the taste of this dried longan muffins.

Longan Walnut Muffins
Ingredients
150g Top flour
2 tsp double-acting baking powder
1/2 tsp fine salt
110g dark brown sugar
70g dried longan
3/4 cup hot water
2 eggs
70gm butter, melted
1/2 tsp vanilla extract
1/2 cup longan water
75g walnuts, roasted and chopped coarsely

Method
1) Hydrate the dried longans in the 3/4 cup of hot water for 20-30 minutes. Strain the hydrated longans and squeeze lightly to remove excess water. Reserve 1/2 cup of the soaking liquid.
2) Sift top flour, salt and baking powder together.
3) Combine cooled longan water, melted butter and vanilla together
3) Whisk eggs and brown sugar till creamy. Add the butter/water mixture and whisk till just combined.
4) Fold in the flour lightly, add 50g of the chopped walnut and the dried longans.
5) Mix well and spoon batter into muffins/cupcake cases, top with the balance chopped walnuts.
6) Bake in a preheated oven at 180 degree C for 30-35 minutes for medium sized muffins and 20-25 minutes for mini muffins. Skewer test for doneness.

Note:
1) The batter is quite runny.
2) Pulverize your brown sugar if necessary to remove any big lumps.

Updated 6 June 09
I have corrected the walnuts to 75gms (50gms in batter + 25gms for garnishing. I had earlier indicated 150gms as I had doubled the recipe. Thousand apologies for the mistake.


Photobucket