Sunday, July 30, 2006

Of Chinese Sausages & Hot Dogs


No I am not making another East Meets West dish.

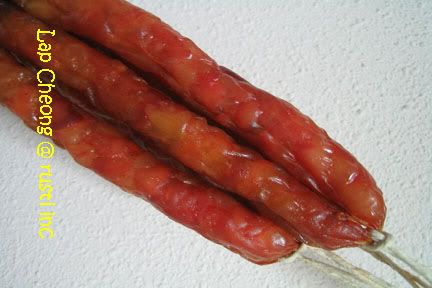
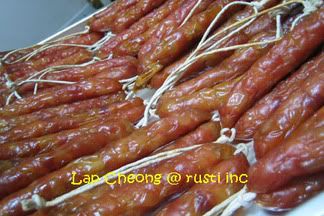
Rather I made (or should I say, attempted to make) Lap Cheong (Chinese Sausages) today. So what's up with the Hot Dog thingy. As I had to make a 'smoking oven' to dry the lap cheong, I had to leash Rusti, my jack-russell terrier,to a corner of the balcony. As you know, JRTs are demolishers. They dash around the house at breakneck speed, knocking down things in the process. I do not want him crashing into the oven and so had to leash him. He was one mad dog. So there's one HOT (angry) dog for you.

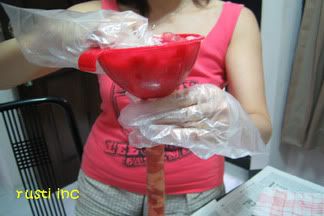
Coming back to the lap cheong. Eversince I saw the Glutinuous Rice Sausages featured in Jo's Deli, I was obsessed to find those sausage casings in Singapore. It took me a good six months before I finally hunted down a shop in Chinatown that sells them. I was elated when I finally laid my hands on two bundles of the casings (S$10/bundle).
Photobucket - Video and Image Hosting
During the six months of hunting, I was meanwhile bugging my 3rd sister to dig into her archive of recipes for the lap cheong. The last time we made this dried delicacy was between 30 to 35 years ago. I was only a puny little kid then but I had the recollection of her scrapping the fresh pig's intestines to make the casings herself and then eventually smoking them inside one of those big rectangular oil tin to dry them out above a blazier. Gosh! It's so long ago!

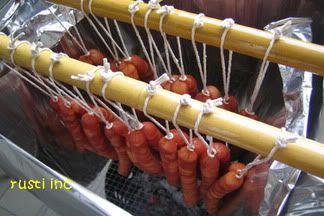
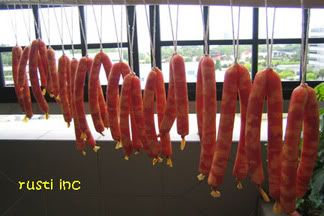
Fast forward to today, DH help to construct the oven using 2 panels of those tri-fold stovetop greaseguard placed ontop a wiremesh. The whole thing is then placed over the blazier. The sausages are then suspended over the burning coals to slowly dry them out. It took almost 7 hours of smoking-time before the lap cheong reached an acceptable level of dryness.

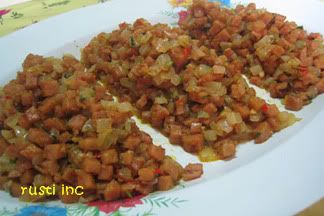
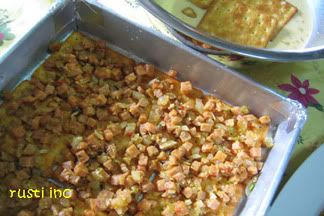
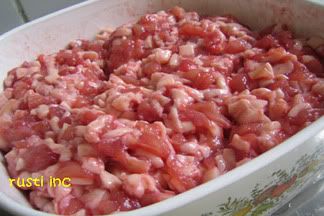
A long process no doubt, from dicing the meat, stuffing the casing with the meat mixture and the long wait for them to dry.
Photobucket - Video and Image Hosting

Photobucket - Video and Image Hosting


Photobucket - Video and Image Hosting


DH who had busied himself the whole afternoon tending to the amber coals says ''Once is enough! No more home-made lap cheong. Buying them is cheaper!''. I grin sheepishly at him and countered: "Store bought no sense of achievement mah! Nothing like homemade.''

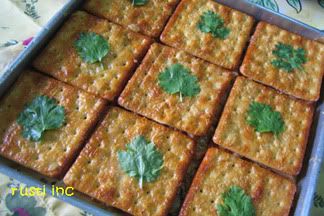
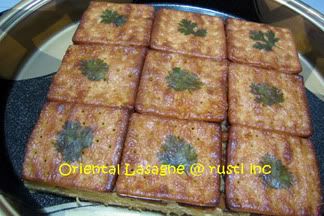
And the end results?? It did not turned out looking like normal lap cheong because they were not dried out per-se but were cooked. Tastewise it was more like the Taiwanese Sausages. The bottom tips were slightly burnt because the dripping oil had created a leaping flame that singed them black.
Photobucket - Video and Image Hosting

So will I make them again? Yes, if I can think of a better way to smoke them, or perhaps I should have just air dry them.

Photobucket - Video and Image Hosting


But then again, perhaps I should have just made the Glutinous Rice Sausages instead.....

East Meets West ~ Well Almost


Had a meet-up with some good friends for lunch on Saturday. As I had a class on Friday night that ended pretty late, I was unable to prepare anything fancier and so decided to make an Oriental Lasagne. The original name for this kueh is Teatime Snack. I renamed it as Oriental Lasagne after slight modification to the ingredients and also because it is similar in style to the Western Lasagne. Try it! You will be amazed how the humble luncheon meat and cream crackers can yield such a delightful treat.

Ingredients:
36 pcs cream crackers
5 eggs
1 can lowfat evaporated milk

Fillings:
1 can ham-luncheon meat
2 large onions (white type)
2 cloves garlic (chopped)
4 chilli padi (chopped) - optional
1 tbsp Cilantro(chopped)
1/2 tbsp curry powder
Salt & pepper to taste

Method - Fillings:
1)Dice luncheon meat & onions in cubes about the size of green peas.
2)Heat 1/2 tbsp of oil till hot and saute onions till translucent.
3)Add garlics and continue frying for further 1 minute.
4)Push onions to the side of the frying pan, add 1/2 tbsp of oil to heat.
5)Add curry powder and chillies and fry till fragrant.
6)Combine with onions and add in the luncheon meat.
7)Fry till evenly mixed and season with salt and pepper.
8)Lastly add in the cilantro.
9)Divide into 3 portions and set aside.
Photobucket - Video and Image Hosting

Method – Assembling
1)Grease and line a 23 x 23cm square tin. Meantime, bring steamer to the boil.
1)Beat eggs and evaporated milk well. Season with salt and pepper.
2)Soak 9 pieces of cream crackers briefly in egg mixture.
3)Line the tin with the soaked crackers in a 3 x 3 fashion.
4)Top with one portion of the fillings.
Photobucket - Video and Image Hosting

5)Repeat with 2 more layers of soaked crackers/fillings, ending with a layer of soaked crackers on top.
6)Pour the balance egg mixture into the tin and leave to soak for about 3-5 minutes.
7)Compress gently with a spatula.
Photobucket - Video and Image Hosting

8)Steam for 20-25 minutes over high fire.
9)Cool before removing from tray
Photobucket - Video and Image Hosting

Friday, July 28, 2006

Eat Your Rice!


A couple of weeks back, DH, DD and I made a daytrip to Johor Bahru. As usual, my first stop would be the bakery ingredients/equipment shop. My usual haunt would be Ng Ming Huat which is situated just next to the Crystal Crown Hotel. However this trip, my 'target' is Bake Well Ingredients Centre. Amelia,(whom I got to know through Kitchencapers, a cooking forum)gave me the driving instructions to the shop which is located near the Larkin Stadium. Thanks Amelia.

The shop is chockful of baking ingredients & equipment (what else!), some of which cannot be found at NMH. I saw these bags of Rice Bubbles and immediately the thought of Mi-Chang, a snack not unlike the Western muesli bar, came to mind. This Asian snack is made by mixing rice bubbles, roasted groundnuts & white sesame into a thick maltose-based syrup and left to set before cutting into bars. So I grabbed a 500gm pack (@ RM7.50) to be added along to the shopping basket.

So here I was last evening making my first Mi-Chang. Here is the recipe:

Ingredients A:
1.5 litre water
700g sugar
1-1/2 tbsp maltose
1 tbsp lime juice (strained to remove pulp)
1/2 rice bowl(appx 125ml) cooking oil
1-2 tsp finely shredded lime zest (optional)

Ingredients B:
500g Puffed Rice Bubbles
300g dry roasted groundnuts (remove the brown skin)*
70g dry roasted white sesame seeds

Additional roasted white sesame seeds (optional)


Method:
1) Boil ingredients A over medium heat for about 30 minutes to reduce mixture to a thick syrup. The lime zest can be added towards the end of the boiling time. (Test syrup for readiness by dropping some into a bowl of tap water. If it solidifies immediately, then it is ready).
Photobucket - Video and Image Hosting

2) While the syrup is boiling, line two trays with aluminium foil and set aside.
3) Check that your rice bubbles are crispy. If they have gone soft and chewy (like mine did), dry roast them in a wok over a small-medium fire till they have crispen up again. Leave it in the wok to cool.
4) Toss ingredients B together.
Photobucket - Video and Image Hosting

5) When the syrup is ready, pour this into the rice bubble mixture and mix quickly till the syrup coats everything evenly. Warning: The syrup is extremely hot.
Photobucket - Video and Image Hosting
6) Spread the mixture in the prepared tins and sprinkle with the additional sesame seeds, compact the mixture with a rolling pin and/or a metal compacting presser.
Photobucket - Video and Image Hosting

7) Leave to cool and cut into squares before storing.
Photobucket - Video and Image Hosting

Note:
1) With the above proportions, I made two trays. A larger tray measuring 10" x 14" and a smaller tray measuring 9" x 11"
2) *If roasting the groundnuts is a hassle for you, then do it the 'quick & dirty' method. Buy ready roasted groundnuts. If they are salted, try and remove as much of the salt as possible. (I used double-layers of tissue paper and started 'grabbing' the nuts to absorb the excess oil and salt.)

Wednesday, July 26, 2006

Tuesday, July 25, 2006

It's Peanuts


Just bought the latest cookbook on swissrolls by Kevin Chai. Titled Elegant Swiss Rolls, the book featured close to 60 recipes using ingredients like pumpkins, yam, beetroot, chicken floss, cabbage and even spring onions.

I picked the Peanut Butter Swissroll to start with as I had all the ingredients on hand. Peanut butter is added both to the sponge mixture and also incorporated into a buttercream icing to be used as the fillings. Elegant my roll is not. DH commented that it is too thick. He sounded like Little Red Riding Hood talking to the Big Bad Wolf. ''Oh what a thick swissroll you have there mama".

Adapted from:
Source: Chai, K. (2006), Elegant Swiss Roll
Malaysia: Famous Cuisine.

Ingredients for the Roll:
7 eggs
120g fine sugar
140g plain flour
60g creamy peanut butter (not the chunky type)
20g butter

Method:
1) 1) Combine butter and peanut butter in a heatproof bowl and heat for about 60-90 seconds to melt everything. Set aside to cool.
2) Grease a 10" x 14" (25 x 35cm) jelly roll tin and line with greaseproof paper.
3) Whisk sugar and eggs till light and fluffy.
4) Fold in the sifted flour gently.
5) Fold in the melted butter/peanut butter.
6) Pour into the prepared tine and bake at 200 deg C for 10 minutes.
7) Leave to cool completely.

Peanut Buttercream Filling:
100g creamy peanut butter
125g butter
60g fine sugar
1/4tsp vanilla essence

Method:
1) Whisk butter and sugar till light and fluffy.
2) Add in the essence and the peanut butter.
3) Mix till combine

Assembly:
1) Remove paper from the cake and place it on a fresh piece of greaseproof paper. Trim away the crisp edges on all four sides.
2) Spread fillings over the entire cake.
3) Using the paper as a guide, roll up the cake..

My Notes:
1) This is not your regular featherlight & fluffy type of swissroll.
2) The texture is soft but dense (not dry though).
3) I've made a note to try with cake flour next round to compare the texture.
4) I stored the cake in an airtight container in the fridge and found that it tasted better chilled.

Sunday, July 23, 2006

Sweet or Savoury


This Asian steamed sponge is sweet while the fillings, which is a layer of minced pork & browned shallots, is savoury. The fillings was a wee bit spicy in taste as it had added curry powder and Thai bird's eye chilli. The combination of sweet and savoury is surprisingly very palatable. My only complaint (my fault) is that I had oversteamed the cake. The original recipe was to be steamed for 30 minutes in a 10" tin. As I had used a smaller tin, I really should have steamed for about 10 minutes less (I did not use up all the sponge batter). It was only when tasting the cake, that I realised that the oversteaming had caused the sponge to be a tad dry.

Cupcakes & More


There has been a revival of iced cupcakes thanks to the televsion series Sex And The City. Sarah Jessica Parker was seen nibbling on an iced cupcake from the famed Manolia Bakery in New York. The rest as they say, is history.

Blog-hopping and from magazines, I found many dainty and pretty cupcakes that have been disguised in all manner of designs. From whimsical animals and clowns to fancy flower baskets and such. All very colorful and enticing indeed.

I too remember that as a kid, I had 'butterfly cupcakes'. This is a cupcake with a conical piece cut from the top and then sliced into two. The inverted cut pieces were then held in place by a dollop of rich buttercream to create the wings of the butterfly. The whole cupcake is then dusted with icing sugar. It was a luxury then to partake in this confection.

With the popularity of iced cupcakes popping up everywhere, I decided to make some myself a couple of weeks back. These are cupcakes flavored with lemon zest and orange blossom water and then topped with a zesty cream cheese icing. They were simply delish.

Monday, July 17, 2006

Long Overdue

Being a person who loves to cook and bake, I have always wanted to share my cooking escapades (as the name of this site suggests) with anyone who is able to gain access to what I was doing. Procrastination has put me off once too many times and it’s great to finally start off on this site and I hope whatever I cook, bake or create will be as useful to me in my learning journey as it will be to you.

The interest in cooking and baking began at the age of seven and it was generated through the influence of my dearest mother. I started off by assisting her with simple tasks like cracking gingko nuts and removing golden brown membranes from the roasted peanuts that were placed on a large and round rattan sieve. Slowly and surely, I graduated to washing rice, vegetables and meats etc.

As the youngest child of a large family, I would sometimes be teased at the mess that I create by my group of elder siblings consisting of three brothers and four sisters. It also seemed like the love for cooking and baking is destined to run in the blood of the females in my family and each possesses a different area of specialty: Dim Sum, Restaurant Cooking, Cakes & Cookies, Curries the list goes on.

Hence, I hope to continue exploring the wonders of cooking and baking which is something that is able to bring people together. And I hope that you will be greatly blessed by this.

With that, I bequeath My Cooking Escapades to the wonderful people who take time to look through this site.