Wednesday, August 30, 2006

Tirimisu for Jane


Made another Tirimisu on Monday evening. This is a tried and tested recipe courtesy of Vi, a very talented Romanian lady residing in the US. Vi is such a whiz with baking and cooking and she makes the most incredible flowers & animals out of fondant. Oh yes, Vi makes her own cheeses & sausages too! It is such a privilege to know Vi.

Back to the Tirimisu. I decided to make one for Jane as I will go pass her home, on my way for kickboxing lessons on Tuesday evening. I have known Jane for many years now. We were colleagues before, and then we were coursemates in business school and now, though we work in different organizations, we keep in contact by emails and SMSes and eating binges with some other friends. Sure we have our occasional quibbles over certain issues but then that’s that. No grudges and our friendship is as good as new!

I really did a lousy job of decorating the cake as I had less than 40 minutes from between reaching home from work and then zooming off for classes. After a dusting of cocoa powder onto the top of the cake, I quickly whipped-up a batch of fresh cream to plaster the lady's fingers to the sides and then hid the cut ends with a gold ribbon. Off I go to deliver the cake.
Cheers Jane, Photobucket - Video and Image HostingTirimisu with a double dose of Kahlua Rum & Bailey’s Irish Cream. **Hic**

Sunday, August 27, 2006

Chinese Sausages Again

If you have read my earlier post Of Chinese Sausages & Hot Dogs you would know that I had previously tried to make some Chinese Sausages. Although I was happy with the taste, I was disatisfied with the end result because, instead of being smoke-dried, the sausages ended up being almost cooked.

I made a second attempt yesterday. A smaller batch this time of only a kilo of meat. I set the oven to fan-forced assisted, at a low 60degC and left them inside for a good 10-hours afterwhich they were left to cool in the oven overnight. They are still not fully dried when I took them out this morning. Not wanting to put them back in the oven to dry, I enlisted the help of Mother Nature to air dry them. I have no idea how long it will take ~ 12 ~ 24 ~ 48 hours??? I hope they will not turn bad but I guess there is enough Chinese wine in the meat to preserve it. Well you won't know till you try it right?

Freshly stuffed & drying in the oven at 60degC
Photobucket - Video and Image Hosting

After 10 hours in the oven, they have shrunk somewhat but not fully dried
Photobucket - Video and Image Hosting

I removed and used the 'veil' from a netted food cover to protect the sausages from dirt to finish off the drying process.
Photobucket - Video and Image Hosting

So now, I will just twiddle my fingers and wait in anticipation for them to turn into skinny wrinkly sausages. Keep tuned to this blog for the result.

Addendum added on 1 Sep: After 24-hours of air drying, the sausages have reached the correct level of dryness. My fears of them turning bad were unfounded as the added wine had done it's job of preserving the meat. My only grouse now is that the flavor is not as intense as the commercial ones. I will have to relook at the seasoning proportions for a more flavorful sausage.

~~~~~%%%%~~~~~~

While the sausages were drying in the oven yesterday, I managed to make a Spicy Sindhi Chicken Bryani for lunch. Taste was great except that the rice was softer than I had wanted. The bryani was accompanied by a salad of cucumbers, pineapples, large onions and green chillies tossed in tangy Indian yoghurt & washed down with a glass of refreshing Lemongrass Lemon Chiller.
Photobucket - Video and Image Hosting
Thank you to Zurynee who pointed me to where I could purchase the Sindhi Bryani Spice Mix.

Thursday, August 24, 2006

Pumpkin Almond Tarts


I have some cooked and pureed pumpkin sitting in the fridge which were leftover from Sunday’s Mee Suah Kueh. Was wondering what to do with them last night and I narrowed myself down to two options: either adding some coconut cream to it and turning it into a gruel-like sweet pumpkin dessert or make them into Pumpkin Tarts. After checking what was available in the pantry, I decided to make the tarts.

I have changed the recipe somewhat by increasing the ground almonds and adding custard powder for a firmer texture. The golden tarts are very fragrant and not too sweet. The fillings is not at all mushy as it has a bit of a bite coming from the ground almonds. This recipe is definitely a keeper!

Source: Kor, W (2006), Dessert’s Temptation – Wendy’s Delights
Malaysia: Seashore Publishing

Pumpkin Almond Tarts

Tart Shells
200g plain flour
10g milk powder
80g butter
40g icing sugar
¼ tsp salt
1 egg (beaten)
½ tsp vanilla essence

Fillings
400g cooked pumpkin
30g sugar
70g ground almonds
1 egg (beaten)
½ tsp vanilla essence
1 tbsp custard powder

Almond Flakes for garnishing

Method for the Tart Shells:
1) Sift flour & milk powder together.
2) Cream butter & icing sugar till fluffy.
3) Add the salt, egg & vanilla essence and continue to beat till well mixed.
4) Add in the flour and mix them well into the butter mixture with a rubber scraper till just combine.
5) Cover and leave the dough to rest for 30 minutes.
6) Press small pieces of dough into lightly greased tart tins
7) Using a fork, prick the base of the tart shells 2 -3 times. This is to prevent the base from ballooning up during the blind baking process.
8) Bake at 180degC for 10 minutes.

Method for the Fillings:
1) Skinned & dice the pumpkin into small pieces. Steam or microwave in a covered casserole till soft.
2) Mash the pumpkin. You will need 400g of the pureed flesh.
3) Stir in the sugar to the hot pumpkin and leave aside to cool slightly, and then add the ground almonds, egg and vanilla essence.
4) If the mixture is too wet, you can add in the 1 tbsp of custard powder.
5) Fill the half-baked tart cases with the pumpkin fillings, decorate with almond flakes and bake for 15-20 minutes at 180degC till cooked.
6)Immediately remove the tarts from the tart tins and cool them on a wire rack.

Sunday, August 20, 2006

This Week

Bought a packet of Premix Tirimisu recently and tried it on Tuesday.

The premix consist only the powdered cheese that you rehydrate with water. You are still required to make the syrup from scratch, make the sponge base if you are not using store-bought ladies fingers, and whip up some fresh cream to be mixed into the rehydrated cheese.

In the end, I wondered if this qualifies to be called a premix as the amount of preparation needed is no different from a regular recipe.

Anyway, this tirimisu passed the test. Tastes good and no one would have been any wiser if you want to proudly declare, 'Hey, I MADE this MYSELF'.
Photobucket - Video and Image Hosting

The whole week zoomed by rather quickly and on Friday, I started on my Advance Cake Decorating class.

It was so much fun to be creating roses and chrysanthemums etc just by a mere squeezing of the icing cone. However, I still cannot get the hang of the correct pressure to apply as the edges of all my flowers came out jaggered:

Roses: This is the first flower we piped that evening. Surprisingly, all of us could managed it quite well at our first attempt. As the rose is the most common icing flowers to appear on decorated cakes, we will have to practise this every week till we perfect it. Showed the picture of the rose to my friend and she says it looked like a cabbage. Possibly the edges are too jaggered.
Photobucket - Video and Image Hosting

Apple Blossom: The second flower for the night. Supposedly easier, but none of us could do it well as the rose.
Photobucket - Video and Image Hosting

Sheep: Ha! Look at his eyes. Seems to be bulging out. Perhaps he has an overactive thyroid gland.
Photobucket - Video and Image Hosting

Chrysanthemum: Lovely isn't it but we have been 'cautioned' against icing this on our cakes. Why? Just look around the wreaths at a funeral wake. Need I say more? We are learning the chrysanthemums more for the technique than anything else.
Photobucket - Video and Image Hosting

Fantasy Flower: Looks more like the top of a coconut tree to me.
Photobucket - Video and Image Hosting

Finally, to round off the week, made two Steamed Pumpkin MeeSuah Kueh, one for home and one for a gathering. This is a prize winning recipe by a Malaysian lady using MeeSuah (flour vermicelli), shredded pumpkin, minced pork, chinese mushrooms and fragrant dried shrimps. Tastes like a cross between a yam cake and a pumpkin cake.
Photobucket - Video and Image Hosting

Thursday, August 17, 2006

Recipe for Roti Canai

This is for Amrita

Roti Canai
Ingredients:
400g all purpose flour sifted with ½ tsp salt
40g chilled butter, cut up into small pieces
3 tablespoon condensed milk*
1 egg, beaten
1/2 – ¾ cup water
Oil/ghee, for soaking and shaping

Method to Prepare Dough Balls:
1. Place sifted flour on your worktable and rub in butter with your fingertips
2. Mix egg and condensed milk together and stir into flour till just combined.
3. Gradually add 1/2 cup water, mixing it in the flour with your hands until it forms a soft dough. (If your dough is too dry, add the remaining water, 1 tbsp at a time till it forms a soft dough)
4. Knead for about 5 mins, until dough is pliable.
5. Cover with a plastic wrap and leave to rest for 30 mins.
6. Scale dough into 10 pieces (approx 65-67gm each) and form into balls.
7. In a deep bowl, pour in about 1/2 cup of oil/ghee. Put in the dough balls, making sure you coat each ball thoroughly*. (Make sure balls are completely soaked in oil/ghee, if not, top up with more oil/ghee.)
8. Cover with a cling wrap and set aside for at least 6 hours or overnite.*

Shaping the Roti Canai:
1. Place a dough ball on your greased worktop.
2. Using the heels of your palms, push dough outwards gently till it flattens into a very thin (almost translucent) layer.
3. Smear some oil/ghee onto the surface. Fold top & bottom half towards the centre (trapping as much air as you can). You should now have a very soft & ‘bubbly’ strip of dough.
4. Coil it inwards into a ball.
5. Leave aside to rest for about 5 minutes.
6. Again, greasing your palms slightly, flatten the balls gently, moving from the centre outwards in a clockwise direction till you have reached the size & thickness you want. (better to press it thinner as it will shrink slightly and therefore becomes thicker. I prefer to let it rest for another 5 minutes before frying, but you can omit this step.)
7. Pan fry on a non-stick pan till cooked.
8. If you want the layers to be more flaky, place the hot roti canai on the table and sharply 'clap' the pancake along the circumfrence between your palms.

Note:
1. I will use 2 tbsp of condensed milk the next round as I find it too sweet for a roti canai.
2. If you do not want to soak the balls entirely in oil, you can use lesser oil but you would have to turn it around every now and then to make sure it is well coated.
3. As the dough contains eggs & milk, it is better to keep the balls in the fridge while soaking. Leave it to come to room temperature (30-45mins) before using.

Saturday, August 12, 2006

Healthy Prata? No Way!


I tried a Roti Canai recipe today. Just across the Causeway, what is known as Roti Prata here is called Roti Canai there. I honestly do not know if there is a difference between the two. To me, it is the same oil soaked doughball, flattened and fried in plenty of oil in a hot griddle. They are both served in similar manner with a dipping of curry or sugar for the kids.

If you think that a homemade prata is healthy then think again. I can only, in my humble opinion, say that it is only marginally healthier because you can control the amount of oil needed to make this Indian pancake.

Last night, after kneading the Roti Canai dough, it was scaled into balls the size of a big lemon and left to soak, yes soak, in oil overnight. If you do not want to soak the balls, you can use much lesser oil but then, you would have to turn the balls around every so often so that the balls are well coated with oil. The soaking is supposed to relax and make the dough more tender rendering it more stretchable.

The finished pancake is very flaky and tasted very much like what a Roti Canai should be. However, it does lack depth because, despite a fair bit of oil is used, the overall amount is far lesser than what is used by the hawkers. Hence the richness is absent on the tongue..

The balls being soaked in oil overnight.
Photobucket - Video and Image Hosting

If you can flip the dough, congratulations to you. If you can't, then oil the table well, start using the heels of your palm to slowly push the dough outwards thinly. Spreading more oil on it's surface makes it easier to push it outwards!
Photobucket - Video and Image Hosting

Lift the dough up so that it falls into a strip and start coiling it inwards.
Photobucket - Video and Image Hosting

Shape it into a ball and leave it to rest for about 5 minutes on a well oiled surface.
Photobucket - Video and Image Hosting

Oil palm well and start to flatten the ball in the clockwise direction moving from the centre outwards.
Photobucket - Video and Image Hosting

Pan fry over medium heat till cooked. The only concession here, is that you could fry it in a non-stick pan therefore using slightly lesser oil than the Roti Canai man.

Photobucket - Video and Image Hosting

Friday, August 11, 2006

Chocolate Mayonnaise Cake


This was made last night. I have heard of homemade facial masks using mayonnaise but a chocolate cake! Well I never. At least not till now!

Surprisingly, the texture is so soft and light. The mayonnaise is not overpowering as I can only detect a faint aftertaste. But then, I suppose the brand of mayo may make a difference as some are more sour, salty or even oilier tasting than others. (By the way, I used Heinz 'Original Recipe' mayo). You can top the cake with a chocolate ganache if you want a richer (read: fatter on the waistline) chocolate taste.

This is an extremely easy and fuss-free recipe as all you need is a wooden spoon/hand whisk to mix the ingredients. No electric mixer is required.

Ingredients:
110g mayonnaise
125ml buttermilk
1 tsp vanilla essence
120g all-purpose plain flour
20g cocoa powder
1-1/2 tsp bicarbonate soda
110g sugar
(There is no typo mistake here. This recipe uses neither eggs nor butter)

Method:
1) Line a 7" square baking tin with parchment paper (no need to grease).
2) Sift flour, cocoa and bicarbonate soda together.
3) Place the sugar and sifted flour mixture into a bowl.
4) In a separate bowl, mix the mayo, vanilla essence and buttermilk till smooth.
5) Add mayo mixture to the flour and mix till the batter is smooth.
6) Pour mixture into prepared pan and bake at 170 deg C for 20-25 minutes.

Note:
If you have no buttermilk, you can add 1-1/2 tsp of lemon juice to a glass of milk to make up to 125ml.

Sugar Baby

On medical leave today as I have a stye on my right lower eyelid. In case you are wondering what it is, a stye is also known as a hordeolum, and it is an inflammation of the sebaceous gland in the eyelid. The swelling is even causing my right cheek to hurt.

In our younger days, the grandmother story was that if you peeped at someone of the opposite sex peeing, you will get a stye . Ha Ha, perhaps I was peeping at Rusti, my male JRT doing this thing.

Anyway, this unexpected leave gave me time to made a batch of sugar paste. I have been so inspired by Glad, my friend from Kitchencapers (a cooking forum), who makes the most fantastic creation out of sugar paste (fondant). She is really good with her fingers and she is so creative.

After a bit of 'long-distance' coaching from her, I decided to try some on my own. After mixing the sugar paste, you have to leave it to 'develop' overnight so that the paste is more mallaeble. Me, being the kancheong spider, just could not wait. With whatever paste that was left on the table and scraper, I created my first sugar craft figurines.

Here is my sugar baby girl sleepy snugly under her blanket and a cherry blossom.
Photobucket - Video and Image Hosting
And here is Ratbit with his swiss cheese. This was supposed to be a rat but in the end, it turned out looking more like a rabbit. This is what happens when you try cross-breeding a rat and a rabbit. Hmmph..
Photobucket - Video and Image Hosting

Now I cannot wait for the rest of the paste to be ready.

Wednesday, August 09, 2006

Rose Rose I Love You


Made a birthday cake for my colleague today. Her birthday is actually not till this coming Sunday, but since it is a holiday today, I could spare all the time in the world to leisurely decorate the cake. I hope she likes it as she is my first 'guinea pig' to receive a decorated cake since I completed the foundation cake decorating class last week.

Anyhow, this is not the first time I am baking a birthday cake for her. I remembered last year, I made Rich Chocolate Fudge Cake for her. At that time, we have just received news from our Corporate HQ in France that our company has been acquired by another bigwig company. We took the news sadly and told ourselves that we may not have the chance to remain colleagues much longer. So it was with much trepidation that when I presented her with the chocolate cake, I told her we may not get to celebrate further birthdays as colleagues together .

One year down the road, I am only too happy to say that we are still going strong in the office.

So here's wishing sweet Felicia, a very a Happy Birthday and may we celebrate many more to come.

Monday, August 07, 2006

Happy Birthday Singapore


Happy Birthday to You
Happy Birthday Dear Singapore
Happy Birthday to You


Was supposed to ice the cakes with the Singapore Flag but found out too late that I had ran out of cochineal (red) food color and also, I could not find my smallest star nozzle. Haiz! There goes my show of Patriotism.

In the end, just made do with the red candy-coat Hershey kisses. And no, we are not a small red dot, we are more than that!

My wish for Singapore? Cliche as it may sound, I wish for a stable economy, enough jobs for the working population, especially for the older more mature citizens, and peace & harmony for her people.

Sunday, August 06, 2006

Leftovers


Lunch today is a light Chicken Burrito ~ made up mostly from leftovers.....

Chicken shreds from half a roast black pepper chicken leftover from Friday's dinner. Garlic-butter rice leftover from yesterday's lunch. Balance of the carrots, onions & potatoes bought to make the coq au vin.

The Burrito pancakes were bought in the wee hours of Sunday morning from the 24-hour supermarket of Mustafa. Added some cheese to the fillings with a good squeeze of Japanese salad cream and hickory BBQ sauce. Perfect!

Photobucket - Video and Image Hosting

And for dinner, Grilled Batang Fishsteaks topped with sambal chilli. The fish were not bought today but were from a batch bought the previous Sunday. The fishmonger had 'insisted' that I buy the whole tail section and it was just too much to cook at one sitting. After one week in freezer, the flesh is still very firm with no deterioration in texture. The fish is grilled with a head-popping sambal chilli that was given to me by a relative that runs a BBQ Seafood stall. Served with a squeeze of lemon. Superlicious!

Saturday, August 05, 2006

Coq Au Vin

For lunch today, Coq Au Vin , a delicious, robust tasting French concoction of chicken (traditionally prepared with rooster), vegetables & button mushrooms simmered to perfection in red wine.

Having tried this a couple of days ago, I decided to google for the recipe to replicate this for my family.

The chicken pieces were first browned in olive oil after having been left soaking in the fridge overnight in half a bottle of Bordeaux, along with white onions, carrots and an aromatic bouquet garni made up of fresh thyme & bay leaves. The carrots & wine marinade are then added back and the chicken left to stew over a slow fire till tender. Finally, the onions, browned with some bacon strips and fresh button mushrooms are added to finish off the dish.


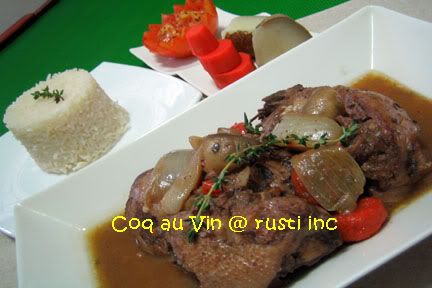
Coq Au Vin, served with a lightly flavored garlic-butter rice, grilled tomatoes, potatoes and carrots.

It was unanimous! DH, DS & DD just loved it. A resounding success I must say.

For Jo, here is the recipe:

Coq Au Vin
Ingrdients
1 large chicken (cleaned, chopped into fairly large pieces)
½ - ¾ bottle of Burgundy (I used Bordeaux)
2 carrots (quartered)
2-3 large white onions (quartered)
4-5 garlic cloves (whole, smashed)
200-250g fresh button mushrooms (halved)
6 rasher of bacon, sliced thinly
Bouquet garni made up of 3 sprigs fresh thyme & 1 bay leaft
1 – 2 cups clear chicken stock
Olive oil
Salt & pepper to taste

Method:

One day ahead:
Put the well drained chicken, carrots, onions and bouquet garni into a ziploc bag or glass casserole with cover. Pour in the wine and marinate overnight in the fridge. Stir occasionally.

On the day of cooking:
1) Remove and drain the chicken and vegetables (separate the carrots & onions). Set aside the wine for use later.
2) Heat olive oil in a deep pot. Brown the chicken pieces in batches. Remove and set aside.
3) Saute the garlic and bouquet garni in the same pot for a couple of minutes.
4)Add the carrots and the chicken pieces and the wine. Top with 1 cup chicken stock. Season with a little salt & pepper.
5) Bring to the boil and then lower heat to stew till chicken is tender..
6) Meantime, brown the bacon, onions & button mushrooms in another pan.
7) When chicken is almost ready, add in the bacon/onions/mushrooms.
8) At this point, if you want a little more gravy, you can add the other 1 cup of chicken stock. Taste and adjust seasonings.
9) Serve with boiled carrots, potatoes, grilled tomatoes and rice or a crusty bread.

Note:
For a thicker gravy, you can:
1) Either dust the chicken with flour before browning them.
2) Or you could mix in 1 tbsp of plain flour to the 2nd cup of chicken stock and slowly stir it in to thicken the gravy.
3) Or you could make a roux to be added to the gravy. To make the roux:
1 tbsp plain flour
1 tbsp butter

Heat the butter over medium flame to melt. Add the flour and stir quickly till you get a smooth and slightly brown (not burnt) paste. Add the 2nd cup of chicken stock gradually, stirring all the time, till you achieve a smooth gravy.
Add this gravy to the pot of chicken and stir through well over low heat till the gravy is incorporated into the the dish.

Faith, Hope, Love & Luck


I know a place where the sun is gold
And the cherry blooms burst with snow
And down underneath is the loveliest nook
Where the four-leaf clovers grow

One leaf is for HOPE, and one is for FAITH
And one is for LOVE, you know
And GOD put another in for LUCK
If you search, you will find where they grow

Buy you must have HOPE, and you must have FAITH
You must LOVE and be strong, and so
If you work, if you wait, you will find the place
Where the four-leaf clovers grow

~~~~~~~Author: Ella Higginson~~~~~~~~~


If you have been to the shopping malls recently, you would have noticed that the jewellery shops and push-carts hawkling costume accessories are flooded with rings, pendants and earrings sporting the 4-leaf clover.

In Irish tradition, The Shamrock, or 3-leaf clover represents the Holy Trinity: One for the Father, one for the Son and one for the Holy Spirit. And when a Shamrock is found with the fourth leaf, it represents God's Grace.

It is said that out of every 10,000 clover leaves, you can only find one 4-leaf clover. It is such a rare occurrence that finding one would surely mean that Good Luck is on your way.

So to spread some Good Luck to anyone who come to this site, here are some 4-leaf clovers for you.

Photobucket - Video and Image Hosting

These Sugar Cookies with a Mint Royal Icing are lovingly decorated by DD.

Thursday, August 03, 2006

Icing Queen Wannabe

Had signed up for a two session Foundation Cake Decorating Class.

After some initial awkwardness in handling the icing bag, we were taught to pipe scallops, rosettes, leaves and scrolling patterns. After just 1 hour, I had stiffed shoulders. Ouch! To take it one stage higher, we were next taught how to pipe a clown figure using a corkscrew movement. Not bad I thought looking at the finished product. DD says the clown is so spooky looking and 'caution' me not to let any kid near him as he would surely scare the living daylights off them. She calls him Freaky Clown. Sob! Sob!

Photobucket - Video and Image Hosting

For my second lesson, we had to decorate a 10" sponge cake. I chose the Strawberry Shortcake motif as I thought it looks simpler than the PoohBear, Garfield and some other cartoon characters. Using a transfer method, the outline of the character was marked in chocolate and left to set. This outline is then placed on the cake to be filled with either icing or piping gel. After struggling for close to 2-1/2 hours, I managed to produce an image with some likeness of Strawberry Shortcake.

Photobucket - Video and Image Hosting

Despite not having 'mastered' the basic patterns, I had already signed up for the Advance class. I am so looking forward to learning how to pipe roses, chrysanthemums, sheeps and elephants.

My wish? To be able to decorate something as elaborate as a 3-tier wedding cake but in the meantime, practice, practice practice.

Wednesday, August 02, 2006

Thy Neighbor's Temptation


I had no intention to do any baking last night as I have a pile of clothes to be ironed and well,I was feeling a little bit tired.
As I was dragging the iron across DH business shirts, I could detect a sweet fragrance in the air as the breeze carried through the window, the familiar aroma of a cake being baked. I do not know which of my neighbor is at it again. A few whiffs and I felt like a drug addict on cold turkey! The temptation to bake a cake was too great and I can resist no more! I zip through the ironing and the instant the iron was switched off and the ironing board stowed away, I was already flipping through my cookbook to select a recipe. I finally settled on an Oreo Coffee Buttercake.

So at close to 9.45pm, I started to feed my addiction:

Ingredients:
200g self-raising flour
200g butter
170g sugar (original recipe was 200g)
4 eggs
1 tbsp instant coffee powder
1 tbsp hot water
½ tsp vanilla essence
7 Oreo cookies – chopped
3 Oreo cookies, additional – chopped (for topping)

Method:
1) Preheat oven to 175 deg C. Grease and line an 8” diameter tin.
2) Dissolve the instant coffee in hot water. (Note: I used ½ tbsp hot water and ½ tbsp Bailey Irish Cream instead). Set aside.
3) Cream butter and sugar till light and fluffy.
4) Beat in the eggs, one at a time and beating well after each addition.
5) Stir in the dissolved coffee, vanilla essence and the chopped Oreos
6) Fold in the flour and pour into your prepared tin.
7) Sprinkle the additional Oreos on top and bake for 40-45mins or till cooked.

No more cold sweat and shaking hands. My addiction was satisfied!