Sunday, July 26, 2009

Excuse Me, Are You A Cake?

Photobucket
Cupcakes: “Errh excuse me, are you a cake?”
3-Tier Cake:“Well yes, of course I AM a cake. Isn’t that obvious? I look every inch a cake don’t I?
Photobucket
Single Tier Cake: “If you are a cake, why don’t you smell like us? You do smell funny. You know that don’t you?”
3-Tier Cake:“I don’t smell like you only because I have a big bottle of baby powder tucked right in my middle! And quit being so rude to me, I am much taller and stronger than you guys and you know WHAT that means don't you?”
Photobucket
Edna Faith: "Hey you cakes, quiet down. This is my party and don't steal my thunder or I will have you all eaten up. And Diaper Cake, I am not done with you till I finished MY BUSINESS on your smug face."

Ha Ha! I can imagine this conversation going on at the table amongst the Cupcakes, Single-tier Cake and Diaper Cake, as they eyed each other with suspicion.

It was Edna Faith’s Full Month party and I made this Diaper Cake for J, the baby girl’s mummy. Knowing that L and G will be bringing some lovely edible cakes to sweet Edna's party, I opted for a conventional baby gift presented in an unconventional way. A Baby Diaper Cake.

The baby diapers are rolled up individually and arranged in rings and then finally stacked into three tiers to look like a cake. The cake was decorated with other ‘ingredients’ like roses made with baby socks, pacifiers, toys and a pretty headband.

Diapers all rolled up and fastened with ribbons and rubberbands.
Photobucket

Roses made with baby socks.
Photobucket
Diaper rolls adorn with a butterfly
Diaper Cake

The whole 'confection' is topped with a You’re Sooo Sweet cake topper.
Photobucket

Friday, July 10, 2009

S-M-L Cupcakes

Cupcakes,Frosting
If you are expecting to see cupcakes in Small, Medium and Large sizes, then you have been mislead by my post title.

S-M-L here refers to the Strawberry, Mint and Lemon frostings atop the cupcakes.
Cupcakes

I first came across the recipe for crusting buttercream about three years ago and about how you can achieve a real smooth frosted surface on a cake by using Viva paper towels. Being one with really shaky hands that can make cake decorating with any types of cream turn out looking like earthquakes, I never bothered to test out the crusting buttercream. Not until now.

Two Saturdays ago, I strolled into the basement of the Paragon Shopping Centre and spotted a popular deli there. Inside their refrigerated showcase, were some brightly frosted cupcakes that seems to be beckoning to me. The Lemon Cupcakes looked so darn pretty delicious that I had to buy one to satisfy my desires to bite into them.

It was love at first bite when I realized the frosting was a Crusting Buttercream. And so this is how it tasted! The exterior of the frosting has dried into something slightly softer then that of royal icing and it does not stick to your fingers when touched. Beyong the crusted surface, the insides are still soft. It was a much neater eating as you do not get cream sticking all over your lips. The cake though, was really nothing to shout about. DH and DS who had a bite each commented that my cupcakes tasted better. I should be pleased with the compliments but my focus then, was diverted to the frosting and not on the cake. I imagined how it would taste with different flavors added.

The following week, I had the chance to test out a batch of the Crusting Buttercream on some cupcakes for a family weekend gathering.

I flavored the frosting with strawberry syrup, mint essence and lemon paste. The results were good especially the mint and the strawberry. They crusted nicely and although it is made mostly with shortening (oh I can hear some gasps in the background), it tasted neither oily nor waxy. After the frosting has crusted, it was a breeze to handle the cupcakes. You know how fiddly it is to handle cupcakes that have been iced in regular frosting or creamcheese frosting. There is this tendency that the cream will get smudged!

Strawberry - Using Alteco #853 Deep Cut Closed Star Tip
Cupcakes,Frosting
Mint - Using Wilton #48 Basketweave Tip
Cupcakes,Frosting
Lemon - Using Alteco #195 Special Decorating Tip for Drop Flowers
Cupcakes,Frosting
The feedbacks were good compared to regular icing although some still preferred the usual creamcheese frostings that I usually make.

All packed and ready to go in my Cupcake Courier.
Cupcakes,Frosting
Cupcakes,Frosting

Postscript (1 August 2009)
At the request of several requesters, I have added information of the icing tip used for the different designs.

Sunday, June 28, 2009

Berry Nice Strawberry Bars

I have so far only tasted Lemon Bars which I loved for its citrusy flavor. So when I came across a recipe for Strawberry Bars I told myself that I have to try it out for myself.
Fruits,Strawberry,Berries
If you can imagine eating a buttery shortbread that is spread with strawberry jam then you are almost there. The Strawberry Bar is one notch better as the 'jam' part is part custardy and sticky at same time. Lemon juice and zest gave it the tangy kick while the distinctive strawberry makes this a 'berry nice' bars.

Cookies,fruits

Friday, June 26, 2009

My Beef Stew

This was last Sunday's lunch which I only found time to post now. I did not follow any recipe but made a shopping list of the ingredients I think I need. I ended up with 2 trays of beef chuck tender, 2 bags of carrots, 1 bag each of large onions and potatoes, 1 bottle of Virginia Dare Cooking Sherry, 2 boxes of chicken stock, a 3-pouch pack of Masterfood Bouquet Garni. On an impulse I added two cans of stewed whole tomatoes into the trolley. Not wanting to have any vegetables leftover from cooking, I proceeded to use up everything in sight. So in a way, I created my own recipe as follows:
beef stew
My Beef Stew
Ingredients:
1.7kg beef chuck tender, diced into cubes
500gm large onions, chopped
1kg carrots, diced in big chunks
1kg potatoes, quartered
12 garlics, smash and remove skin
375ml cooking sherry
2 litres chicken (or beef) stock
2 x 411g canned stewed whole tomatoes (I added the juice from only one can of tomatoes)
2 tbsp maple syrup (also added on an impulse to balance the sourness of the tomatoes)
2 pouches bouquet garni
4 tsp black pepper
4 tsp worchestire sauce
Flour for dusting
Olive Oil

Method:
1) Dust the beef in flour and brown in batches in some olive oil. Set aside.
2) In a deep pot, sweat the large onions in some olive oil. Add garlic and continue sauteing until the onions is almost caramelised.
3) Add the browned beef, black pepper and worchestire sauce and stir for a while. Add in the cooking sherry. Let it simmer for a while to evaporate the alcohol.
4) Add the bouquet garni, carrots and 1 litre of chicken stock. Bring to the boil and then lower heat. Simmer for about 45 minutes stirring occasionally.
5) Add the potatoes and the balance 1 litre of stock and continue cooking till beef is tender.
6) Adjust seasoning. (At this point, I added the maple syrup!).
7) Serve hot with a crusty bread and a green salad.

Washed down with a glass of refreshing Mint Lemongrass Lemonade Chiller
beverages,drinks.
Note:
1) You may wish to thicken the stew if you find it too watery. I made a roux by melting approximately 100gm of butter in a small saucepan over low fire. Add 1 heap tablespoon of flour and fry till the flour turns slighty brown. At this point remove the saucepan from the flame and pour in a 1/2 cup of water and stir till smooth. Bring saucepan back to the flame and stir till thick and shiny. Temper the roux with some gravy from the stew before adding it to the stew to thicken it.
2) I did not add any salt to the stew as the chicken stock is already salty as is the bottle of cooking sherry from Virginia Dare.

Cupcakes for my Daughter

Today is the last day of work for my daughter at a designer furniture company. She has worked there for slightly over a year and she decided it is time to make move to a position that has more relevancy to her Mass Communications Degree.

These cupcakes are for her to bring to the office as a farewell treat for her colleagues.

Vanilla Cupcakes using a recipe from the Magnolia Bakery and with a Creamcheese Frosting that I put together with some icing sugar, butter and vanilla extract.
cakes; Cupcakes; Cream Cheese
Saying Ciao
cakes; Cupcakes; Cream Cheese

Tuesday, June 23, 2009

Apricot Cheesecake Ripple

I bought a tray of lovely luscious golden apricots from the supermarket last night and made these yummy Apricot Cheesecake Ripple which was adapted from a recipe originally using plums.
The cake has a very nice caramel flavor coming from the dark muscovado sugar and a slight salty flavor from the creamcheese ripple. Once baked, the apricots were bursting with juice, was cottony soft and it felt like with each bite, tangy apricot conserve oozing into your mouth.
It would be a good idea after filling the tray to drop the tray a couple of times onto your table top to remove any trapped air bubbles. I did not do that as you can see from the picture below – two big holes in the cake.
Cakes,Fruits
Apricot Cheesecake Ripple
Ingredients:
250g cream cheese, softened at room temperature
1 tsp vanilla extract
3-3/4 tbsp sugar
5 eggs
220g butter, softened at room temperature
220g dark Muscovado sugar
250g plain flour
1-1/4 tsp baking powder
400g fresh Apricots, halved, stoned and diced
Method:
1) Preheat oven to 175 degree C.
2) Grease and line a 20x30cm lamington tray making sure the paper is extended about 5cm above the tray on all sides (this is to add removal of the cake after baking).
3) Cream the cheese, sugar, vanilla extract and 1-1/2 eggs together till smooth and free from lumps.
4) In another bowl, cream the butter and Muscovado sugar till creamy. Add the balance 3-1/2 eggs and continue creaming till light and fluffy.
5) Beat in the sifted flour and baking powder for approximately 2 minutes till well combined.
6) Spread half of the flour mixture onto the tray, dot with half the cream cheese mixture and scatter with half of the apricots.
7) Repeat with the balance flour mixture, cream cheese and top with the balance apricots.
8) Bake for 30-35 minutes in the centre of the oven till just firm to the touch. The cream cheese ripple will firm up further when cool, so do not overbake.

Monday, June 15, 2009

7-Up Bundt Cake

My brother bought this Kitchen Aid bundt pan for me quite a while back and, like the few other baking pans which he bought back from the US, they have yet to be used.

So yesterday, I googled for a Bundt recipe and I came across this 7-Up Bundt Cake which sounded very interesting and pardon the pun, refreshing too. All the reviews for this cake were good except some said it was sweet.
Photobucket
I made some adjustments to the sugar and also used a combination of plain flour and cake flour for this recipe. I also added lemon zest and some lemon juice abeit insufficient, to perk up the lemon-lime flavor of the 7-Up.

Even though the pan is non-stick, I gave it a good coat of baker's grease as I want to be sure the cake can be removed without any problem. Sticking is an inherent problem with Bundt cake pans due to the intricate designs.
Cakes
The cake was very soft and with tender crumbs. However, despite reducing the sugar, it still tasted sweet to me. The taste of 7-Up is not very apparent in the baked cake although you can still taste it faintly.
Photobucket
I will bake this cake again some other time however the sugar must be reduced further and more lemon juice added.

I am glad I did not make the icing sugar glace to drizzle over the cake otherwise the cake would taste even sweeter. I cannot however, resist the temptation of sifting a wee bit of snow sugar over the cake though.

7-UP BUNDT CAKE
(13 cup capacity bundt pan)

Ingredients:
425g butter
690g sugar
6-1/4 eggs
350g plain flour
120g cake flour
1 tsp baking powder
2 tsp lemon essence (or 1 tsp each of lemon and vanilla essence)
225ml 7-up
Juice from 1/2 a lemon
Zest from 1 lemon

Method:
1) Preheat oven to 165 degree C.
2) Grease Bundt pan very well making sure all the nooks and crannies are greased.
3) Cream butter and sugar till light and fluffy.
4) Add eggs, one at a time beating well after each addition.
5) Add the 7-Up to the lemon juice to make up 225ml, then add in the essence and zest.
6) Fold in the sifted flour alternating with the 7-Up to the creamed mixture.
7) Spoon mixture into the prepared pan and bake for 60-75 minutes.
8) Skewer test near the centre of the cake. Cake is ready when no crumbs stick to the skewer.

Baker's Grease:
Mix equare ratio of shortening, flour and vegetable oil into a smooth paste. Use this to grease the Bundt pan. Balance grease can be stored in an airtight container for future use.

Saturday, June 13, 2009

Milk Squares

This is one of those recipes which I copied a long time ago and in my 'to-do list'. Finally had the chance to make it last night.

Photobucket
This bread is kneaded and allowed to proof in the fridge overnight. I made the dough close to midnight yesterday and stayed up till around 2.30am for the 1st proofing while I finish up some office work. This morning, after returning the dough to room temperature, it was then shaped and cut into squares and given a final proofing before baking.

The first tray was spoilt because the oven temperature and timing indicated in the recipe was faulty. It stated to bake for 20 minutes at 230 degree C. Looking at the 4cm x 4.7cm cubes of bread, I decided to bake it at half the time. However even before the 10 minutes was up, all the milk square were baked to a burn. As I do not have the source for this recipe, I am unable to ascertain from the orginal blog if it was my mistake to copy the wrong baking temperature or if it was a genuine mistake of the original writer and if she has had the chance to update this error on her blog. Anyway, I lowered the temperature to 180 degree C and baked the second tray for 8 minutes and they turned out perfect.

The bread is soft, fluffy and mildy sweet. Just remember that the dough has eggs, milk powder and condensed milk in it. So please put it in the fridge for the overnight proofing. With our (Singapore) kind of hot weather, the rich dough can turn bad easily.
Bread
MILK SQUARES
Ingredients:
210gm bread flour
90g plain flour
3g baking powder
9g instant yeast
27g fine sugar
3g salt
75g condensed milk
9g milk powder
Half a beaten egg (approx 30g)
111g water
21g softened butter

Method:
1) Mix beaten egg, water and condensed milk together
2) Combine all dry ingredients together in a mixing bowl, add the liquid and knead for 9 minutes.
3) Add butter and continue kneading for a further 12 minutes or until not sticky.
4) Form into a ball. cover and let it proof for 1-2 hours or until double in size.
5) Knock out the air and shape into a ball. Place in an airtight container and leave in the fridge overnight.
6) Next morning, put the dough on a table, cover lightly with plastic wrap and let it return to room temperature (approx 30 - 40 minutes).
7) Knead lightly and shape/roll into a rectangle shape measuring 14cm x 28cm.
8) Cut into squares measuring 4cm x 4.7cm.
9) Place on a greased or parchment lined tray and proof for 20 minutes or till double in size.
10) Bake at 180 degree C for between 7 to 10 minutes till light brown.

Wednesday, June 03, 2009

Longans Muffins

A couple of weeks back, Dolly, my friend from Taiwan was in town on business. She brought me a box of lovely muffins and muah chee from Gui Yuan Cake(www.guiyuancake.com.tw). They are well known for their Dried Longan Muffins and have won several awards for them too. The shop takes its name after the dried longan which is called Gui Yuan in Chinese. Dolly mentioned that the Taiwanese believe that eating these muffins, especially during the colder months, has a warming effect on the body.

The muffins are choked with hydrated dried longans and chopped walnuts. The dark brown cake has a rich molass flavor and is moist though dense. Biting into one actually reminded me of eating a very fragrant Huat Kueh.

I did some googling and found a few recipes for this muffin and finally settled for one which I felt was a good representation of the ingredients and method I imagine.

Although the original recipe uses cake flour, I replaced that with top flour as I felt it would yield an even more superior product.
Photobucket
Come on, give this recipe a try and you will be enchanted by the taste of this dried longan muffins.

Longan Walnut Muffins
Ingredients
150g Top flour
2 tsp double-acting baking powder
1/2 tsp fine salt
110g dark brown sugar
70g dried longan
3/4 cup hot water
2 eggs
70gm butter, melted
1/2 tsp vanilla extract
1/2 cup longan water
75g walnuts, roasted and chopped coarsely

Method
1) Hydrate the dried longans in the 3/4 cup of hot water for 20-30 minutes. Strain the hydrated longans and squeeze lightly to remove excess water. Reserve 1/2 cup of the soaking liquid.
2) Sift top flour, salt and baking powder together.
3) Combine cooled longan water, melted butter and vanilla together
3) Whisk eggs and brown sugar till creamy. Add the butter/water mixture and whisk till just combined.
4) Fold in the flour lightly, add 50g of the chopped walnut and the dried longans.
5) Mix well and spoon batter into muffins/cupcake cases, top with the balance chopped walnuts.
6) Bake in a preheated oven at 180 degree C for 30-35 minutes for medium sized muffins and 20-25 minutes for mini muffins. Skewer test for doneness.

Note:
1) The batter is quite runny.
2) Pulverize your brown sugar if necessary to remove any big lumps.

Updated 6 June 09
I have corrected the walnuts to 75gms (50gms in batter + 25gms for garnishing. I had earlier indicated 150gms as I had doubled the recipe. Thousand apologies for the mistake.


Photobucket

Monday, May 25, 2009

Another Semolina Cake with Honey Citrus Syrup

Some weeks back, I made a Semolina Cake with Honey Citrus Syrup from a recipe found in the Australian Women's Weekly (AWW).
I had several requests for the recipe and I had promised to come back to the requester as soon as I can find the recipe. Unfortunately, I could not find the original recipe. I thought I had tore off the pages from the magazine and filed it away. No matter how many times I searched through the four arch files of recipes, I could not find it. I then started to search for the magazine hoping that perhaps, I have not torn out the recipes but I could not find it. DH who noticed me rumagging through the book shelves, drawers, coffee table and even the stack of old newspapers enquired what I was searching for. When I told him I was searching for that particular magazine he gave me a sheepish grin and said he remembered throwing it out. Grrrrrrrrrrrrrrh!

So what to do? I trawled the net hoping to find THE recipe but I had no luck finding it. I even wrote to AWW in the hope they will send me the recipe (and I am still waiting hopefully).

Anyway, something good did turn out from the internet trawling. I found another variation of this cake that looks quite promising. The fact that it uses separated egg yolks and whisked stiffened eggwhites tell me that this would be an even lighter cake than the original one. So yesterday, I test-kitchened this version and the result did not disappoint. In fact, this second cake tastes much better than the first as it has dessicated coconut and marmalade added to it. So before I start to loose this recipe as well, I am quickly posting it here.

I hope this recipe will do for the few ladies who wrote to me for the original recipe.

Photobucket
Honey Citrus Semolina Cake II
Ingredients:
6 eggs, separated
100g sugar
100g dessicated coconut (I used 75g)
140g flour
270g semolina
25g ground almonds (I used 50g)
20g baking powder
240ml cornoil or canola oil
300ml freshly squeezed orange juice
60ml lemon juice
1 teaspoon each grated orange and lemon zest
240ml orange marmalade

Honey Citrus Syrup
3/4 cup sugar
2 tbsp honey
1/2 cup water
1/2 cup orange juice
1/4 cup lemon juice
(You can use 3/4 cup orange juice and omit the lemon juice but I prefer a mixture of orange and lemon juice)

Method:
1) Heat oven to 180 degree C
2) Grease and line a lamington panwith parchment paper making sure the paper extend 3cm above the pan.
3) Sift flour and baking powder together. Add in the coconut, ground almonds and semolina and stir to combine well.
4) Mix oil, beaten yolks, marmalade, juices and zest together. Stir in the dry ingredients.
5) Meantime, whisk egg whites and sugar till stiff peaks form.
6) Fold the egg white to the flour mixture taking care not to deflate the egg whites too much.
7) Pour mixture into the prepared tin and sprinkle with some almonds slivers if desired.
8) Bake for 30 minutes or until a toothpick inserted in the middle comes out clean with no sticky crumbs.
() While cake is baking, prepare the syrup by boiling the liquid till it is reduced to slightly more than half a cup.
9) Pour hot syrup over the cake the moment you remove the cake from the oven. Cool in the pan. Cut and serve.

Pumpkin Ginger-Nut Muffins

Remember after last week's pumpkin mee suah cake I had this piece of pumpkin leftover? Well I made some Pumpkin Ginger-Nut Muffins a couple of days after that. I did not know what to expect of the final results as I was either short of this or short of that. After steaming whatever pumpkin I had, I realized that it yielded only one third cup of puree instead of the required one cup. I did not have plain flour and so substituted it with half-and-half of cake flour and self-rising flour plus another half teaspoon of baking powder. I have no ground nutmeg and so used only the allspice, cinnamon and ground ginger. And perhaps due to the shortage of mashed pumpkin, the mixture turned out very dry. I then added 75ml of unsweetened soya milk to loosen up the mixture. The muffins turned out super nice though! They smelt heavenly and the texture was just nice with a nice crunch coming from the chopped roasted walnuts and candied ginger. It was especially good eaten warm and just as good when cold. Best of all, they remained soft and moist even after 24 hours.

Photobucket

Pumpkin Ginger-Nut Muffins
Ingredients:
1-1/2 cups flour (3/4cup ea of cake flour + self-rising flour + 1/2tsp baking powder)
1/2 teaspoon of salt
1 cup sugar
1 teaspoon baking soda
1 cup cooked pumpkin purée (1/3 cup)
1/3 cup melted butter
2 eggs, beaten
1/4 cup water (plus 75ml unsweetened soya milk, if needed)
1/2 teaspoon nutmeg (I did not have this)
1/2 teaspoon cinnamon
1/2 teaspoon allspice
1 teaspoon ground ginger
1 cup chopped toasted walnuts or pecans (I used pecans)
2 Tbsp well chopped candied ginger
Method:
1) Preheat oven to 175°C.
2) Sift the flours, baking soda, baking powder and spices together. Stir in the sugar, chopped nuts and ginger and mix throughly.
3) Mix the pumpkin, melted butter, eggs and water together. Stir well to disperse the mashed pumpkin and then combine with the dry ingredients until just incorporated. Do not over-mix. If the mixture looks dry at this point of time, then stir in the soya milk.
4) Spoon mixture into a prepared muffin cups and bake for 25-30 minutes.
5) Check for doneness by inserting a skewer into the center of a muffin. If it comes out clean, it is done.
6) Cool on a rack.
Note: Ingredients in brackets are the changes made by me.

Sunday, May 17, 2009

Pumpkin Mee Suah Kueh

Made this savoury Pumpkin Mee Suah Kueh for Saturday's breakfast. This is about the third or fourth time that I have made this. The first was in this earlier posting in August 2007.

This time around, I added some five spice powder to the pumpkin-pork mixture to give the kueh a better fragrance.

Photobucket
Now I am wondering what to do with the leftover piece of pumpkin sitting in my fridge??!!

Sunday, May 10, 2009

Orh Ku Kueh

To translate directly from Hokkiean dialect, 'Ku' means tortoise whilst 'Kueh' means cakes. The Ku Kuehs comes in a myraid of colors:- Purple, Green, Yellow and the very popular Red. The cake is shaped like a tortoise and therefore Ku. The 'Ang'(Red) Ku Kuehs are commonly used during celebrations like weddings, baby's full month and birthdays to signify longevity as tortoise are known to live till a ripe old age. The purple, green and yellow are the more 'modern' creations in the recent years with purple yam, pandanus juice added to give the skin the distinctive purple and green. They are usually filled with a sweet filling of mashed mung beans or peanuts. The Yellow Ku Kueh are usually filled with sweet mung beans to which mashed durian flesh has been added.

The mini Kus, each measuring 6cm long and 4.2cm across.
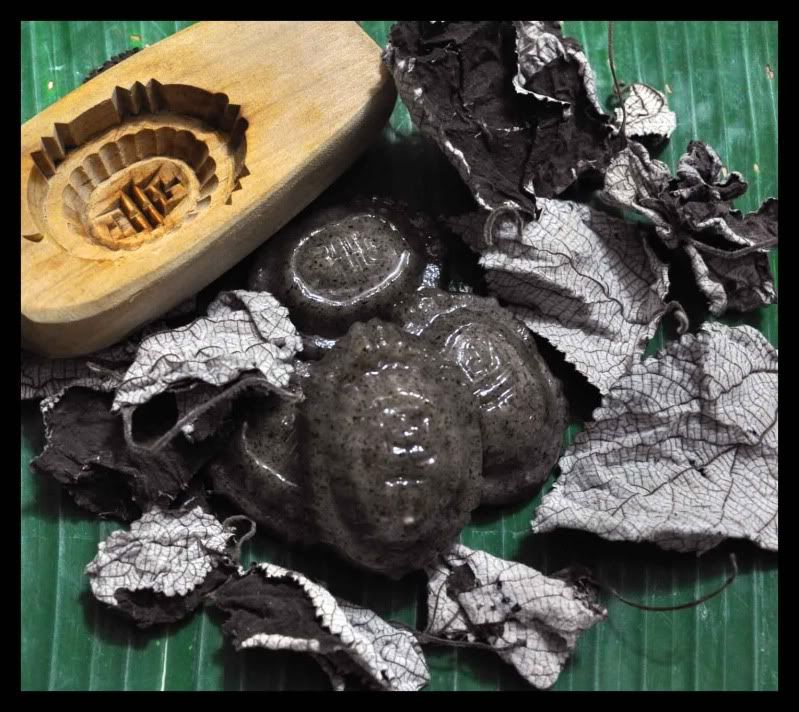
Photobucket

Photobucket
The 'Orh' (Black) Ku Kueh or Black Tortoise Cake which I have here could have been a Hakka snack. I am just guessing as these black 
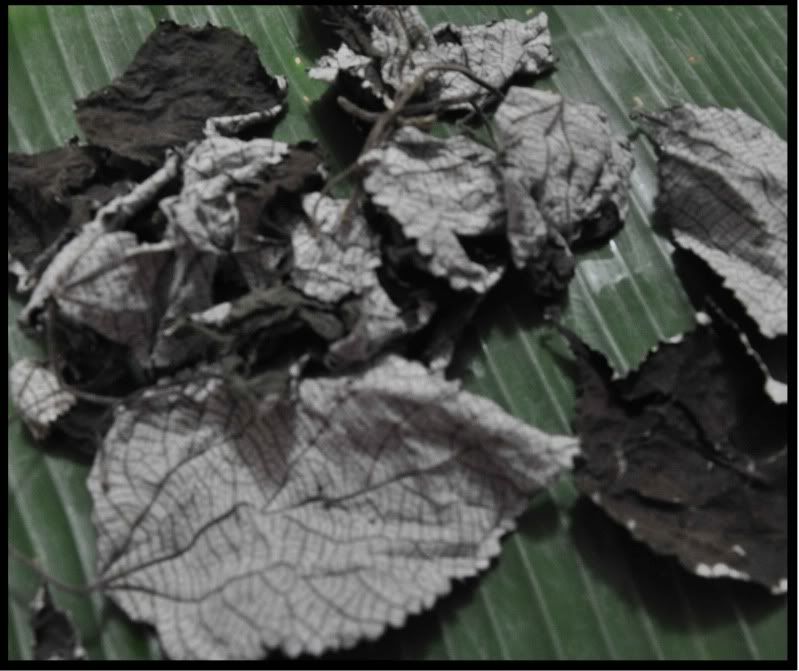
ku kueh gets it black hue from the leaves of the Rami, Choy Yip or Mugworts plant. These leaves are favored by the Hakkas and widely used in their traditional cakes to give them their distinctive black and I believe, for their medicinal properties too!

Anyway,this is the second time that I have attempted this kueh and the skin is much softer than the first attempt which was more chewy. I had added a spoon of rice flour to reduce the chewiness that comes from a skin made with 100% glutinous rice flour. Some recipes for the sweet Kus has mashed sweet potatoes or yam added to give the skin a softer bite while retaining the chewiness.

These black Kus are different from the usual Red, Purple, Yellow or Green Kus as it uses a savoury fillings of chai por (preserved radish) and minced pork which is fried till fragrant and then given a kick with liberal doses of white pepper. The skin however is sweet. In fact, the skin is much sweeter than the sweet ku kuehs. I suppose this is tactical to give the snack an interesting balance of taste from the salty preserved radish.

Fresh or dried, tt is quite difficult to find mugwort leaves here in Singapore. I got the dried leaves shown here from Johor Bahru. The fresh leaves are even more difficult to come by unless you are living in areas where there is a large community of Hakkas.
Photobucket

Traditional Black Angku

Filings:
100g minced chai poh, soaked to remove excess salt
100g minced pork

Seasonings:
1/2 tsp sugar
1 tsp dark soy sauce
1/2 tsp pepper

Marinade:
1/4tsp salt
1 tsp soy sauce
1/2 tsp sesame oil

1) Mix the marinade with the pork and leave in the fridge for one hour.
2) Heat a work with a little oil and saute chai poh till fragrant, then add the minced pork and seasonings. Drizzle in a little water and stir fry well. Dish up and cool.

Skin:
150g choh yip/fresh rami leaves
130g caster sugar
200g glutinous rice flour
25ml cooking oil
125-150ml water

Glazing:
2 tbsp pre-cooked oil

Banana leaves cut into shapes slightly bigger than the mould you intend to use. Brush leaves with oil.

Method:
1) Wash the rami leaves and boil with water for 30 minutes. Remove, drain off excess water and leave aside to cool before blending into a paste.
2) Place the glutinuous flour into a mixing bowl.
3) Boil the water and sugar till melted. Add in the paste and stir to distribute the paste.
4) Pour the hot syrup into the glutinous flour and quickly stir into a dough.
5) Place the hot dough onto a clean table, add the oil and knead till you get a smooth and shiny dough.
6) Scale dough into pieces and roll into ball.
7) Flatten each piece and wrap with the fillings, seal the edges and roll into a ball.
8) Dust with extra glutinous flour before placing into the mould. Press the ball into the mould with your palm and knock the mould to dislodge the kueh. Place on a greased banana leaf.
9) Steam over low flame for five minutes, uncover steamer cover, glaze kueh with cooked oil, Cover and steam for another 2 minutes.

Note:
The original recipe suggested to 'wash' off the excess glutinuous flour from the shaped kueh under a tap (slow water). I did not do it as I use minimal flour to dust the kueh.
As I mentioned, I added some rice flour for a softer skin. What I did was to remove 1/2 tbsp of glutinuous flour and replace with 1/2 tbsp of rice flour.
I used 10gms of dried choh yip which has been soaked overnight to soften before boiling. I cut off the hard stems before weighing the leaves and also to avoid having hards bits of stems in the skin.
You may wish to reduce the sugar for the skin, I find it too sweet.

Wednesday, May 06, 2009

Featherlight Sponge Cupcakes

I bought these pretty cake cases some time back and I had entirely forgotten about them until last week when I was looking for some cake cases to put the Chocolate Mayonnaise Cakes.

As the cases are rather big, I decided against making muffin as I have never like them baked jumbo-sized. A featherlight sponge would be ideal as you can finish the whole cupcake and yet not feel stuffed.

They turned out pretty nice and I love how the cakes can be removed so cleanly without sticking to the insides of the cases.

Photobucket

A slight tug at the corners and the case unfolds easily to reveal the cake.
Photobucket

If the photos seemed a bit blurry, well you are right! I bought a new cammy, a Nikon D90 over the weekend and I am still struggling with the instruction manual and learning how to use it. So until I master how to select the correct aperture, shutter speed and ISO settings, be prepared for more out-of-focused pictures.

Saturday, May 02, 2009

Chocolate Cake with a Difference

This is one of my favorite chocolate cake. It is a cinch to make. No mixer is required and once all the ingredients are measured, it takes just a stir with a hand whisk and the cake is ready to be baked in two minutes flat.

What I love about this chocolate cake is that it is very soft and moist although no egg or butter is used. The secret to the softness and moistness comes from the mayonnaise and buttermilk. It may sound gross as you will hardly associate mayo with cakes but this is truly one cake which you have to try to believe how wonderfully the ingredients meld together to give you a chocolate cake with a difference.


For a more luxurious treat, frost the cake with a chocolate ganache.

MAYONNAISE CHOCOLATE CAKE
Ingredients:
110g mayonnaise
125ml buttermilk
1 tsp vanilla essence
120g all-purpose plain flour
20g cocoa powder
1-1/2 tsp bicarbonate soda
110g sugar

Method:
1) Line a 7" square baking tin with parchment paper (no need to grease).
2) Sift flour, cocoa and bicarbonate soda together.
3) Place the sugar and sifted flour mixture into a bowl.
4) In a separate bowl, mix the mayo, vanilla essence and buttermilk till smooth.
5) Add mayo mixture to the flour and mix till the batter is smooth.
6) Pour mixture into prepared pan and bake at 170 deg C for 20-25 minutes.

Note:
a) If you have no buttermilk, you can add 1-1/2 tsp of lemon juice to a glass of milk to make up to 125ml.
b) For a taller cake, make 1.5 times the recipe above and bake 40 minutes.

Tuesday, April 14, 2009

Lychee Martini Cake

Made this Lychee Martini Cake on Sunday in celebration of my son's 24th birthday. His birthday is actually today and because it also coincides with the first of his six exam papers, we then decide to have an early celebration for him.

I do not have the actual recipe for the Lychee Martini Cake but having tasted a slice of it late last year, I set out to create my own version of the cake.

I soaked some well drained, diced canned lychees overnight in a mixture of Lychee Liquer, Vodka and Limoncello. The 9-inch sponge cake was torted and each layer brushed with a syrup that has been laced with more Lychee Liquer and Vodka. It is then assembled with a filling of whipped cream and the 'drunkard' lychees.

The whole cake is then covered in whipped cream with toasted almond slivers on the sides. I did make a mistake of using the wrong shade of pink for the icing. I had wanted to simulate the very light pink/ivory color of the lychee fruit. The end result was a much brighter pink that would be more suited for a girl recipient than a guy.

So here is my Pink Lychee Martini Cake.
Photobucket
The insides.
Photobucket

This morning, I participated in a contest organized by the radio station Class95 . In the past couple of weeks during the Morning Express program, listeners are encouraged to SMS in birthday greetings to people they know who are celebrating their birthday on that particular day. The prize each day is a birthday cake sponsored by Bakerzin, . You guess right! I participated in this SMS contest and this is the cake which I won for my son. Bakerzin has been very generous to allow the winner to select whichever cake that is available at the outlet and you are even free to choose whichever size you want.

I chose the Ambroisa, a heavenly confection of crunchy walnut dacquoise with Jivara chocolate ganache and nuggets of caramelised bananas.

A big Thank You to Bakerzin and the Morning Express Show for selecting my entry.

Another yummy treat for the birthday boy.
Photobucket
Photobucket

Tuesday, April 07, 2009

Hits and Misses

Over the last few weeks, I have had some hits and misses. Actually more miss than hits.

The first miss was the Japanese Soft Cheesecake. I had wanted to bake this for the longest time but never really got round to doing it for fear of failure. I have heard so many 'horror' stories like the cake collapsing the moment it came out of the oven or even midway through baking and also the texture being very dense and heavy. Hearing all these make me nervous to even attempt it until two weeks ago. I was so careful to follow the recipe to the T (or so I thought). After popping the cake into the oven, I started to clear the tabletop and lo and behold, tucked behind the jar of sugar was the little plastic bag of cornstarch that I had measured out but forgotten to add to the batter. For a second or two, I was debating whether to just leave the cake as it was or to remove the pan and dump everything into the bin. What the heck! I then decided to just pour the batter back into the mixer and give it a quick whisk with the cornstarch. By then, the egg white which I had so nicely whisked up were all deflated. I just poured the batter back into the pan, slam the oven door shut and twiddle my thumbs and hope for the best.

This was how the cake #1 turned out.
Photobucket
Photobucket

Feeling extremely angry with myself, I attempted the cheesecake again the next evening. This time, fearful that I will leave some ingredients 'hidden' away, I place everything in full view.

This is cake #2.
Photobucket
Photobucket

Honestly if you asked me, I preferred the texture from cake #1 which is closer to the ones sold in the bakeries. Cake #2 was way too light and it felt too 'airy' in the mouth.

The second miss was the Hongkong Smiling Paus. Recently two bloggers had tried with great success the recipe posted by me in 2006 at a cooking forum. Their positive feedback to me prompted me to make some myself. It turned out a disaster. I had failed my own recipe. The Paus did not 'smile' at all. In fact they were rather dismal looking. Fortunately, I had only wrapped and filled six paus and then to do a test steaming. I threw away the rest of the dough as I did not want to waste the beautiful char siew fillings on the sad looking paus.
Photobucket

An hour later (and still feeling angry), I mix up a batch of oil and water dough to make the baked Siew Paus. They were terribly difficult to wrap. Despite being careful not let any of the fillings come into contact with the sealing edges of the pau skin, the shaped paus kept popping open the moment I put them on the baking tray. I managed only a few nice ones. I placed those that insisted on popping open into disposable muffin cups to bake.

Photobucket
Photobucket

Ugly looks aside, they were really good. The skin was crispy yet melt-in-the mouth and the fillings juicy.

The only hit I had was this Semolina Cake with Honey Citrus Syrup. Semolina cakes are known to be quite dry. However, this cake is really good. Honey, lemon and blood orange juice is boiled till syrupy. This is then drenched over the cake the moment it came out of the oven. The syrup helps to keep the cake moist without being soggy.

Semolina Cake with Honey Citrus Syrup topped with dried figs.
Photobucket
Photobucket